Worm with Glasses

Coding • DevOps • Personal

May 4, 2023

Yggdrasil VPN

I’m trying to work outside my home office more, but all my email is hosted on my home server. While disconnecting is nice, not having access when I need it has sucked.

Enter yggdrasil!

After installing on my laptop (MacOS) and my desktop (Ubuntu) I updated .ssh/config with my desktop’s IPv6 address and was able to SSH via IPv6 over my local network. Perfect!

Step two: install on a server with a public IP. One more service running on my Digital Ocean instance.

I’m not interested, at the moment, with joining the full yggdrasil network, so I configured my public instance to only allow peering from my laptop and desktop’s public keys:

  AllowedPublicKeys: [
    "desktop-public-key"
    "laptop-public-key"
  ]

On the public server, I listen via TLS rather than plain TCP. It’s slightly slower, but also slightly more secure. Since I’m not moving a lot of traffic over the connection, the extra security is worth it to me:

  Listen: [
                  tls://PUBLIC-IP-ADDRESS:56603
  ]

I couldn’t find a recommended port to listen on, so I picked a random number. 🤣

(The only “gotcha” was remembering to open the firewall for yggdrasil.)

Ramces Red’s article about yggdrasil has more information about installing and configuring a basic VPN.

Mar 6, 2023

How Business Speak Destroys Language

I’m far from the first person to decry how “business speak” destroys our ability to communicate. However, yesterday I read a blog post where “business speak” rendered–genuinely insightful–information less readable:

Even if a project fails before any go-to-market attempt, you can still get learnings out of the experience: You might have picked up some new technology or at least understood somewhat better the inner workings of the organization you work for.

What will be important is to make some effort to capture these learnings lest this value is lost.

(Emphasis added.)

Learnings?

Do people talk like this in real life?

Learnings might be old, but its above usage is decidedly modern and “buzzwordy”.

Why repurpose a word that conveys less information when we have existing strong nouns and verbs?

How about:

Even if a project fails before any go-to-market attempt, you can still learn from the experience: You might have picked up some new technology or at least understood somewhat better the inner workings of the organization you work for.

What will be important is to make some effort to capture this knowledge lest this value is lost.

I won’t nitpick the rest of the sentences: those two changes already improve clarity.

Jan 30, 2023

Lazy Loading Neovim Plugins

A couple of weeks ago I decided to redo my Neovim configuration and lean into Lua. The goal was to optimize startup performance and improve usability.

Follow along with my neovim dotfiles repo

For years, I used Plug to manage my vim plugins, but after seeing TJ DeVries experiment with lazy.nvim, I decided to go all in!

By far, the biggest challenge was learning Lua 5.1. All the scripting languages I’ve used in the past (Ruby, Perl, Python) emphasize a “batteries included” approach. Lua, in contrast, felt like I had to assemble everything from tiny parts.

Once I got past the Lua hurdle, the rest of the conversion was straightforward. Most of the time I could swap out Vimscript with neovim Lua API methods via a regexp.

I’m pleased with the results. Startup time is faster, there are fewer weird bugs, and I understand all the configurations.

Jan 8, 2023

Function Key Snipping with Raycast

Max Gorin posted You’re using function keys wrong where he describes using function keys as a quick launcher!

So, here’s the trick: assign each of your top-12 most used apps to an F-key.

Max uses KeyboardMaestro to show/hide the apps, but we can do the same with Raycast (which I already use, and it’s free.)

Step 1

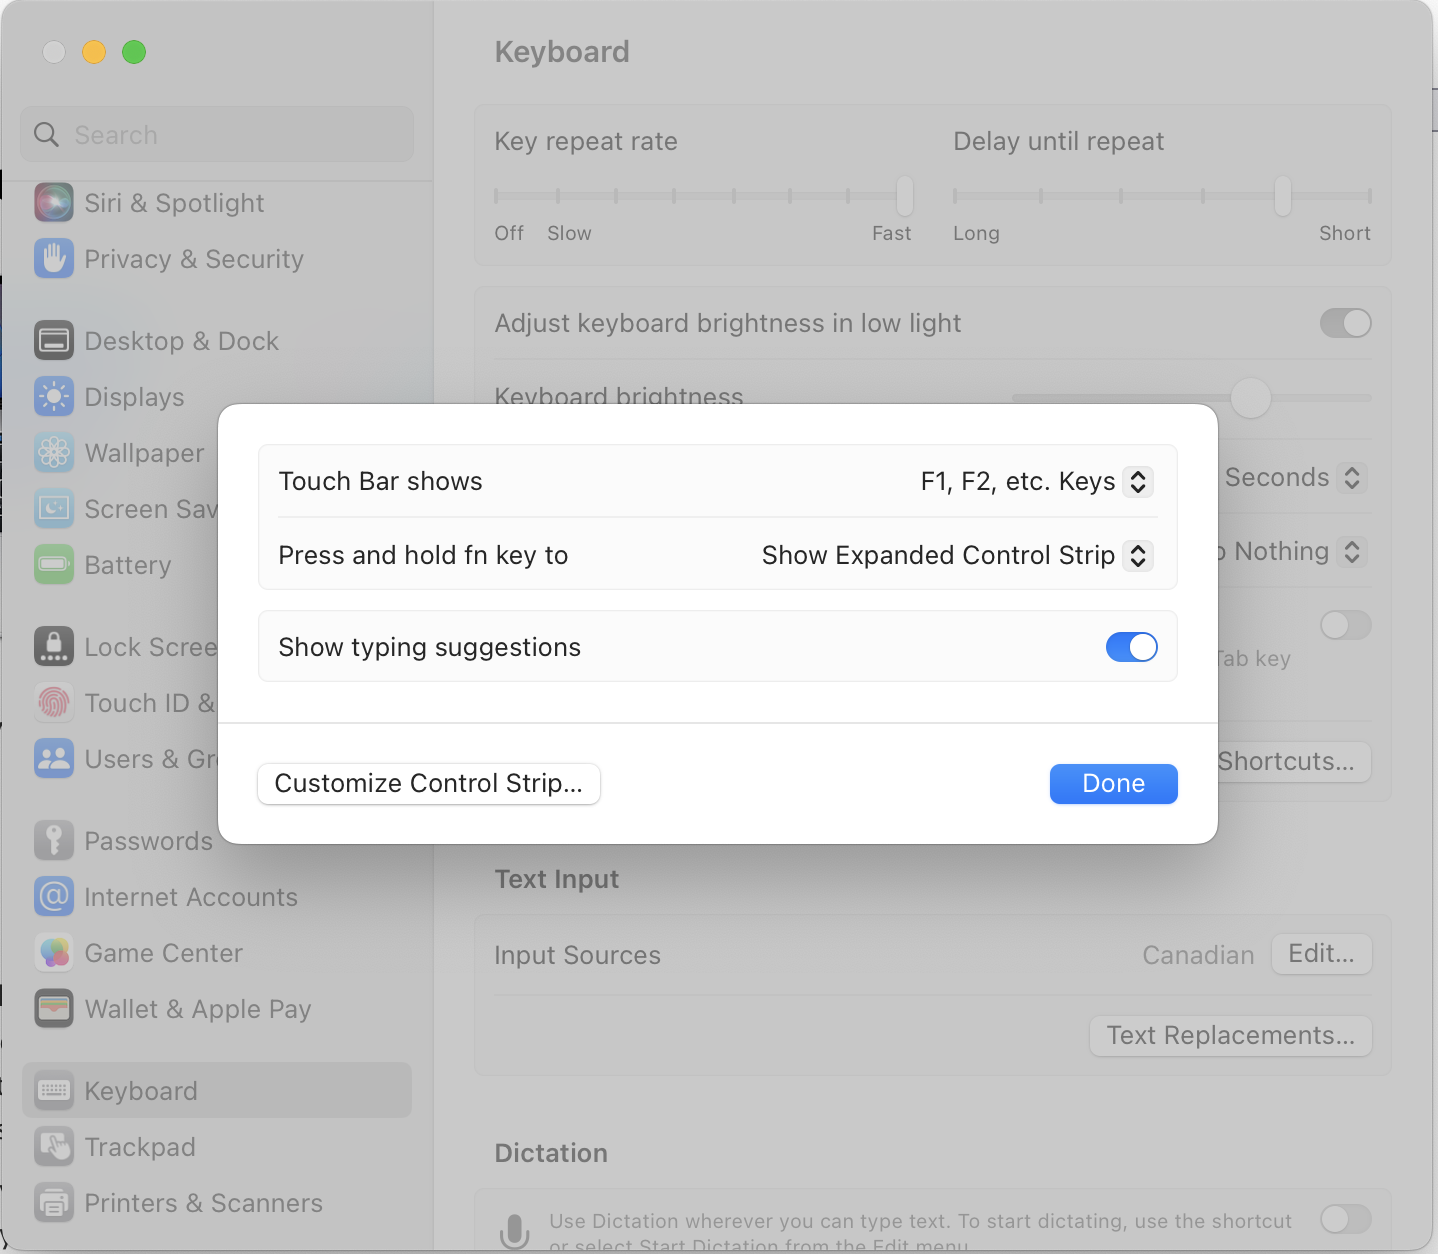
I have a 2019 MacBook Pro with Touchbar so the first change is to always display the function keys.

Within System Settings/Keyboard and Touch Bar Settings change:

  • Touch Bar Shows to “F1, F2, etc. Keys”
  • Press and hold fn key to “Show Expanded Control Strip”
Screenshot of macOS Touch Bar Preferences

Step 2

Install Raycast

Step 3

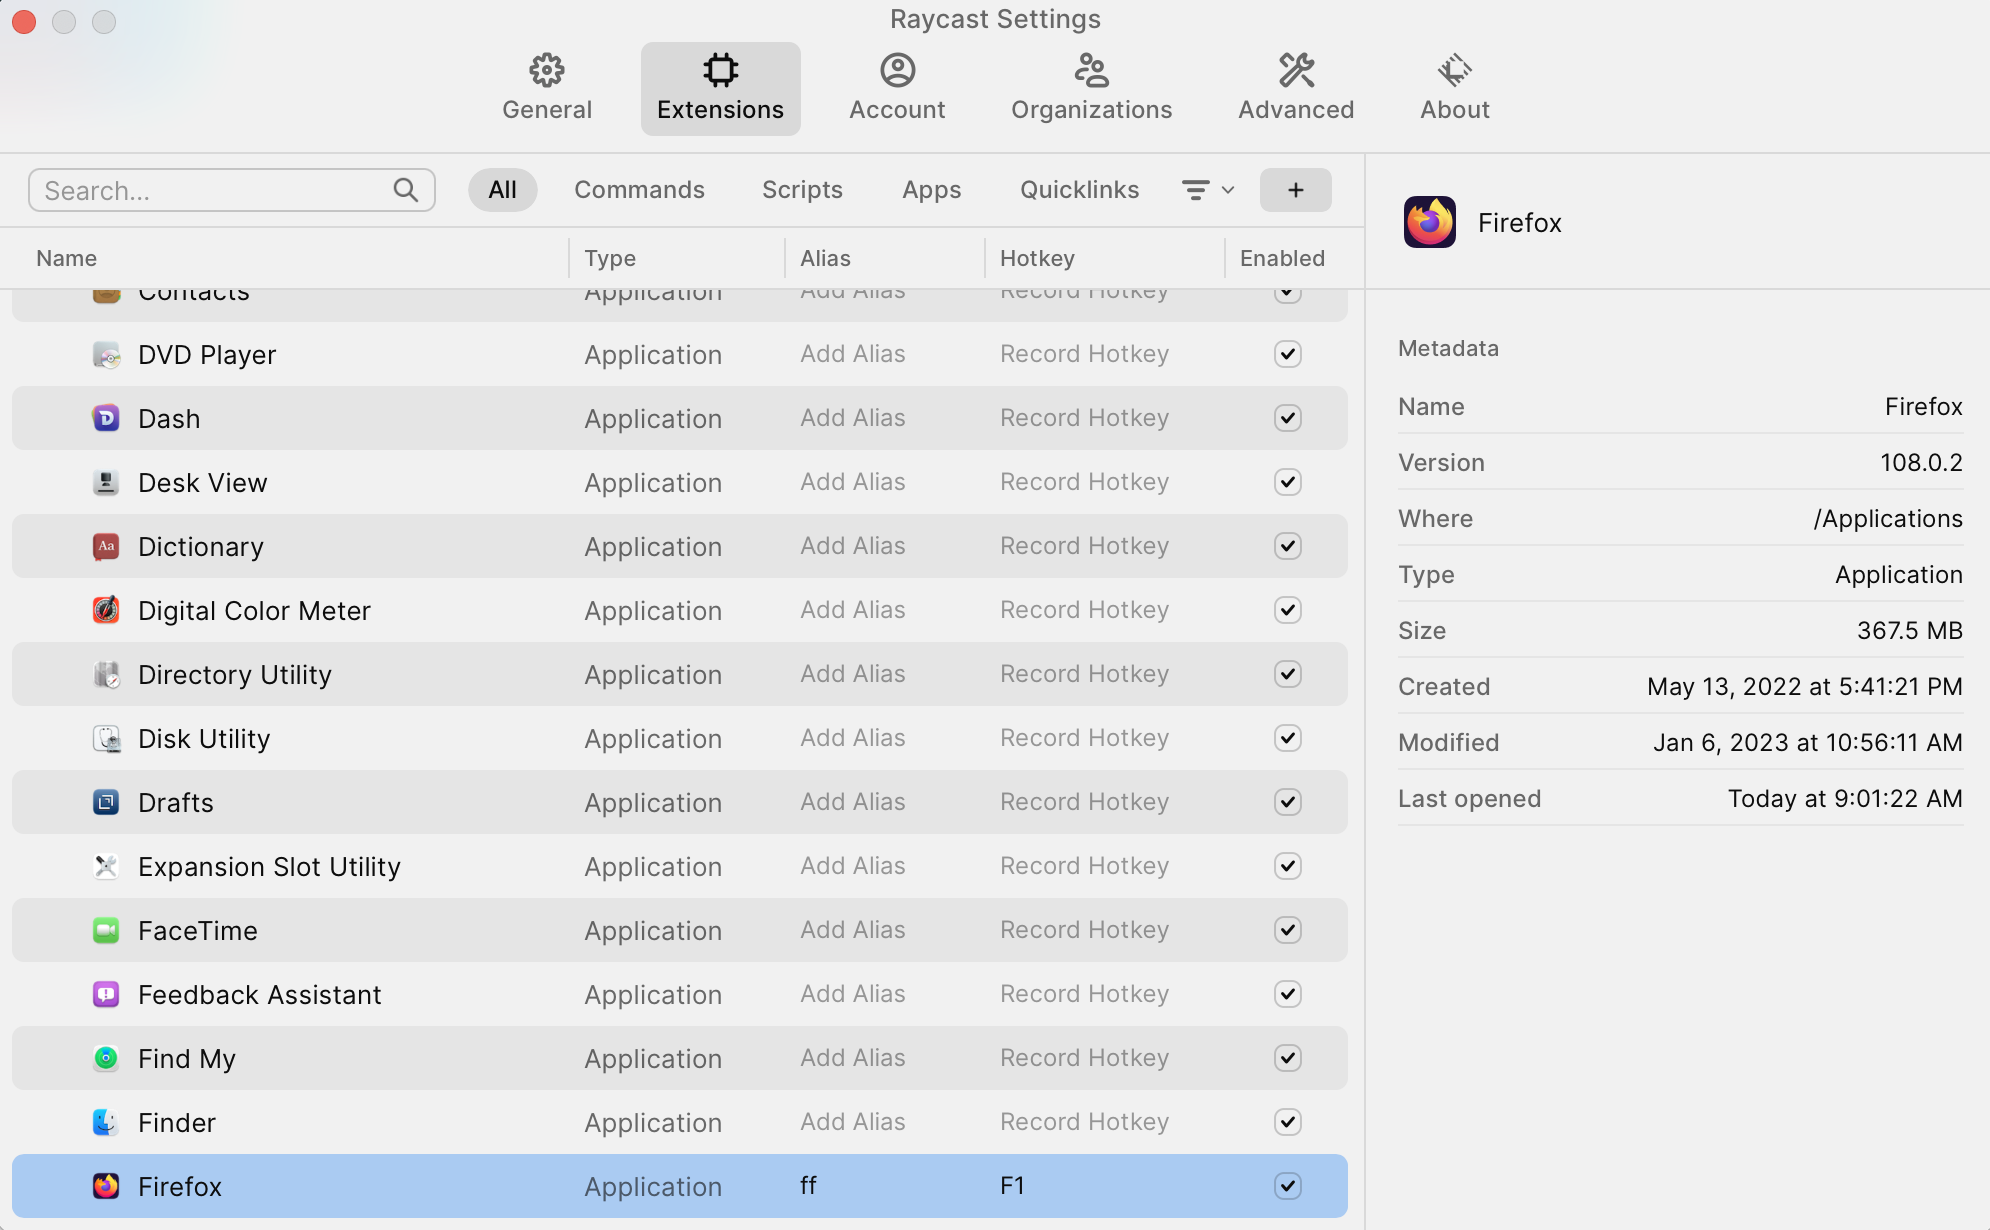
Open Raycast (I use ⌘Space), find the application you want to assign to a function key, and go into application configuration (using ⌘⇧,)

Raycast Application Settings Screen

Hit Record Hotkey and assign it to whatever Fn you want!

For example:

Jan 5, 2023

New Year, New Look

With a new year, it’s time for a new look! Over time, I found the old design too busy. I didn’t have a good idea for a new theme until I happened across Thomas A Caswell’s site. Drawn in by the clean design (inspired by Blue Penguin), I created a new Hugo theme!

I had to make some changes to preserve existing links from the old theme and to maintain the banner images on a smattering of posts.

No Javascript and a lot less markup and CSS.

And if I ever want to switch back, it’s a config.yaml away!

Jan 2, 2023

Yearly Theme: The Year of Creation

I’ve listened to Mike and Grey talk about their yearly themes since 2017, but this year I’ve finally felt motivated enough to commit to a theme.

If you don’t have the time to listen to dozens of hours of podcast episodes, Grey has a great video explaining “yearly themes”:

2020 was a rough year for more than just the pandemic. My parents were diagnosed with cancer. I felt like my life stopped as my attention focused on their care. Mom recovered: dad didn’t.

With my father gone, I picked up the pieces for my mom and helped with all her issues. I deprioritized myself and began to languish. Days spent working as nights devolved into mindless Youtube videos, endless refreshing of my RSS feeds, and bite-sized articles saved to Instapaper.

I created nothing.

After almost three years of this same grind, I can’t keep going on the same path. I started replacing Youtube with books and read almost 20 books since May.

While reading is better than watching, it’s not the same as making.

Therefore, 2023 is the year of creation!

Using Scriptable, I created a yellow sticky note in my phone’s today view to remind me of the year’s theme.

iPhone Today View Sticky Note

My years’ first act of creation: writing today’s post!

May 3, 2022

Seventeen Years and a Million Lines of Code

I was looking at my old development projects recently when I noticed that all of them predate 2005. In 2005, I started work at ePublishing as a Perl developer. In the past 17 years I’ve been:

  • a Ruby and Rails developer
  • VP of Software Engineering
  • Chief Software Architect

In all that time, I’ve written hundreds of thousands of lines of code (maybe more than a million), but it’s locked away.

It’s a bit depressing that almost two-decades of creativity is forever hidden from view. It’s the curse of corporate development: we can write blogs, give talks, and prepare papers, but we can’t show the code itself. All anyone sees are shadows on the wall.

More companies should release their source code. Most of what we write is not the company’s crown jewels. Let people see how you solved that weird 3rd-party integration! Or how you monitor some obscure open-source service.

Every company is standing on a mountain of open-source code. Give back and let your developers have the opportunity to show off!

Apr 30, 2018

Gem Home for Fish Shell

In a recent twitch stream, Gary Bernhardt showed a bit of behind-the-scenes in how he prepares his development environment for recording a screencast.

One of the tools he showed in passing was gem_home by Hal Brodigan.

gem_home is a simple script that manipulates Ruby’s GEM_HOME and GEM_PATH environmental variables in order to keep separate ruby gem locations.

By using gem_home, there is no longer a requirement to prefix all ruby commands with bundle exec. All the gems for a project are local to the project, which eliminates conflicts that might arise when gems for multiple projects are mixed together in one location.

Eliminating the need for bundle exec allows commands such as rspec to execute much quicker!

Unfortunately for me, I recently switched over to using fish shell from ZSH. Hal’s gem_home only supports Bash and ZSH. 🙁

One nice thing about gem_home is how simple and straightforward it is. In a few hours I was able to replicate its functionality as a fish shell compatible script!

If you’re using ruby and fish shell, I would highly recommend using my implementation of gem_home along with Jean Mertz’s wrapper around chruby. Both of these play well together.

Jan 17, 2018

Enabling Vim Rails

vim-rails is enabled only if config/environment.rb is present in the Rails working directory.

At work, we have an engine based working directory that does not contain this file (as there’s an embedded application within the engine.)

To enable vim-rails, I need to do:

echo "load ::File.expand_path('../../embedded-app/config/environment.rb',__FILE__)" >> config/environment.rb
mkdir -p .git/info
echo "config/environment.rb" >> .git/info/exclude

Within the repo to enable vim-rails support.

Dec 8, 2017

Secure SSH Keys and Client Configurations

Red electronic lock symbol against a blue/black background.

SSH is the backbone to how I’m able to work remotely.

Periodically, it’s important to review both my SSH config settings and regenerate my SSH keys.

From my perspective, Mozilla has put together the best recommendations for both server and client configurations. For now, I’m concentrating on the client configuration (within ~/.ssh/config and my SSH keys.)

OpenSSH Client Configuration

Below is Mozilla’s Modern SSH client configuration recommendation:

# Ensure KnownHosts are unreadable if leaked - it is otherwise easier to know which hosts your keys have access to.
HashKnownHosts yes
# Host keys the client accepts - order here is honored by OpenSSH
HostKeyAlgorithms ssh-ed25519-cert-v01@openssh.com,ssh-rsa-cert-v01@openssh.com,ssh-ed25519,ssh-rsa,ecdsa-sha2-nistp521-cert-v01@openssh.com,ecdsa-sha2-nistp384-cert-v01@openssh.com,ecdsa-sha2-nistp256-cert-v01@openssh.com,ecdsa-sha2-nistp521,ecdsa-sha2-nistp384,ecdsa-sha2-nistp256

KexAlgorithms curve25519-sha256@libssh.org,ecdh-sha2-nistp521,ecdh-sha2-nistp384,ecdh-sha2-nistp256,diffie-hellman-group-exchange-sha256
MACs hmac-sha2-512-etm@openssh.com,hmac-sha2-256-etm@openssh.com,umac-128-etm@openssh.com,hmac-sha2-512,hmac-sha2-256,umac-128@openssh.com
Ciphers chacha20-poly1305@openssh.com,aes256-gcm@openssh.com,aes128-gcm@openssh.com,aes256-ctr,aes192-ctr,aes128-ctr

Note these are the “modern” recommendations which assumes the services you are connecting to have been updated recently. I’ve noticed I’ve had to modify these for services like Github with:

KexAlgorithms diffie-hellman-group-exchange-sha1,diffie-hellman-group14-sha1

OpenSSH Key Generation

ED25519 is recommended for all new keys, but not all services support it. For those services we need to fall back to RSA. Using Mozilla’s SSH key generation guidelines, I created a keygen script that defaults to ED25519:

#! /bin/bash
#
# Generate a new ED25519 or RSA SSH key using Mozilla's
# (https://wiki.mozilla.org/Security/Guidelines/OpenSSH#Key_generation)
# recommendations.
#
# Usage: keygen {service_name} [ed25519|rsa]
#
# Defaults to the more secure ED25519.
#

set -e
set -u

service=$1
type=${2:-ed}

case $type in
    ed*)
        ssh-keygen -t ed25519 -f ~/.ssh/id_ed25519_${service}_$(date +%Y-%m-%d) -C "Key for ${service}"
        ;;

    rsa)
        ssh-keygen -t rsa -b 4096 -f ~/.ssh/id_rsa_${service}_$(date +%Y-%m-%d) -C "Key for ${service}"
        ;;

    *)
        echo "Usage: keygen {service_name} [ed25519|rsa]"
        exit 1
        ;;
esac

Now you’ll need to send your new key to the remote server. For example:

ssh-copy-id -i ~/.ssh/id_ed25519_wormbytes_2017-12-08 robert@server.wormbytes.ca

Finally update your ~/.ssh/config and modify your IdentityFile to reference the key that was generated. Something like:

IdentityFile ~/.ssh/id_ed25519_wormbytes_2017-12-08

Conclusion

My recommendation is to review your SSH keys and configuration once a year. While the above configuration is the recommendation today (December 2017) it might not be the recommendation next year. Be sure to check back with Mozilla to see if anything needs to be updated.

Nov 21, 2017

Migrating to Hugo

Back in August I rebuilt the site using Jekyll and Minimal Mistakes for the theme. This worked great for a few months, but even a small site was taking too long to generate (10-15 seconds!)

While 15 seconds per build isn’t much, it was just enough friction to make updating not fun. That’s when I remembered that Julia Evan’s had posted her experience switching to Hugo. A zero second build time was very attractive!

Unlike her, it took me longer than four hours to migrate my site to Hugo! I had used a bunch of helpers provided by Minimal Mistakes that I had to either replace or rebuild. Plus, I had also written a couple of my own custom Jekyll plugins which were converted to Hugo shortcodes.

Migrating to Hugo

Like Julia I started with:

  1. run hugo import jekyll
  2. import a random theme

Getting to this point took no time and a hugo run to build the entire site took 150ms! Milliseconds! Awesome!

Then I hit the hard part. :(

Rebuilding the Existing Theme

I had spent a lot of time before settling on Minimal Mistakes as my Jekyll theme. It’s a great design with lots of functionality (some of which I even used.)

Rather than trying to port the underlying Jekyll templates, layouts, etc. I did what Julia did and copied the generated HTML and assets into the layouts directory of the new site and started digging into the Hugo documentation: while extensive, it’s not exactly user-friendly.

It took me three days of intermittent hacking to ensure all the content was present, with the right URLs, and with all the old Minimal Mistakes helpers removed and my custom plugins written as Hugo shortcodes. (Lots of NeoVim editing to replace the old markup.)

Once the HTML looked right, the last step was to update my workflow scripts.

Gotchas

Parsing dates.

Hugo has the .Format function to parse dates into human readable strings. What I didn’t grasp is that the reference format is very specific. If you don’t format the string using the exact times mentioned in the documentation your rendered dates are all messed up!

Success!

With everything in place I can now publish to the site with way less overhead and friction. Effectively, I go from saving the post to publishing to the Internet in under a second!

The only way it could be better is if I didn’t have to do the pesky writing as well!

Update

Still using Hugo, but switched out Minimal Mistakes for a theme I found online and then customized to suit my preferences!

Nov 17, 2017

Sep 4, 2017

How to be Miserable

One very sad red ping-pong ball.

Back in May, CGP Grey posted a video based on Randy J. Paterson’s book How to Be Miserable: 40 Strategies You Already Use .

After watching the video, I had to read the book. Both Rosey and I finished it in one night. Within his 40 lessons, we each found a least a few that applied to us.

The book is structured as a series of 40 “lessons” on how to be miserable. Of course we’re not trying to be miserable, but following these lessons tend to make one miserable. To be happy, do the opposite!

Mr. Paterson’s lessons are:

  1. Avoid All Exercise
  2. Eat What You’re Told
  3. Don’t Waste Your Life in Bed
  4. Live Better Through Chemistry
  5. Maximize Your Screen Time
  6. If You Want It, Buy It
  7. Can’t Afford It? Get It Anyway!
  8. Give 100 Percent to Your Work
  9. Be Well Informed
  10. Set Vapid Goals
  11. Rehearse the Regrettable Past
  12. Blame Inward, Give Credit Outward
  13. Practice the “Three Bad Things” Exercise
  14. Construct Future Hells
  15. Value Hope Over Action
  16. Become a Toxic Optimist
  17. Filter for the Negative
  18. Cultivate Your Presence—Elsewhere
  19. Insist on Perfection
  20. Work Endlessly on Your Self-Esteem
  21. Become an Island Unto Yourself
  22. Give Them What They Want
  23. Measure Up and Measure Down
  24. Play to Win
  25. Hold High Expectations of Others
  26. Drop Your Boundaries
  27. Bond With People’s Potential, Not Their Reality
  28. Demand Loyalty
  29. React to Their Motives, Not Their Messages
  30. Cultivate and Treasure Toxic Relationships
  31. Keep Your Eye on the Small Picture
  32. Let Your Impulses Be Your Guide
  33. Look Out for Number One
  34. Duty First, Life Later
  35. Live the Unlived Lives of Others
  36. Stay in Your Zone of Comfort
  37. Avoid Solitude
  38. Choose Fashion Over Style
  39. Pursue Happiness Relentlessly
  40. Improve Yourself

I’d highly recommend watching Grey’s video and then reading the book. It will change how you view yourself.

Aug 14, 2017

Little Things I Like to Do with Git

Came across Little Things I Like to Do with Git a while back. Harry has a bunch of interesting git snippets. I found these the most useful:

See Which Branches You Recently Worked On

$ git for-each-ref --count=10 --sort=-committerdate refs/heads/ --format="%(refname:short)"

See What Everyone’s Been Getting Up To

$ git log --all --oneline --no-merges

View Complex Logs

$ git log --graph --all --decorate --stat --date=iso

Aug 13, 2017

Managing Site Content with Sub

No self respecting developer will tolerate writing out the same commands over and over.

Automate All the Things!

With Jekyll building the static files, I needed a way to:

  • create draft posts
  • serve drafts via localhost to review
  • publish a draft as a full post
  • build the site
  • deploy to DigitalOcean

After manually running shell commands and manually editing files, I had to automate the workflow.

I use sub to organize the various scripts that handle each part of the process.

Create Draft Posts

First step was to create a template.md file with all the optional Front Matter a post might need.

---
title:

# # Rest are optional
# categories:
# tags:
# permalink:
# excerpt: # Markdown description before the story
# description: # SEO `<meta>` description (requires an `excerpt`)
# header:
#  image: # Path to the full image for the size (1280x...)
#  image_description: # Custom `alt` tag
#  caption: # Photo credit (can be written in markdown)
#  teaser: # Path to teaser image (roughly 500x300)
#
#  # Hero video image
#  video:
#    id: 
#    provider:
#
#  # An image with text overlay and call to action button
#  overlay_image: # Path to the full image size
#  overlay_filter: 0.5 # opacity between 0.0 and 1.0 (or full `rgba(255, 0, 0, 0.5)`)
#  cta_label: # Call to action button label
#  cta_url: # URL the call to action button goes to
#  overlay_color: # Can be used rather than `overlay_image` as #ccc
#
# NOTE: https://mmistakes.github.io/minimal-mistakes/docs/helpers/
#       https://mmistakes.github.io/minimal-mistakes/docs/utility-classes/
---

You’ll notice that only title is required. Everything is commented out. Also, there’s no date attribute since this is a draft.

When I begin writing a draft I run:

site draft whatever-the-post-slug-will-be

which runs:

#!/bin/sh
set -u
set -e

cp _drafts/template.md _drafts/${1}.md
exec $EDITOR _drafts/${1}.md

A simple script to copy the template into the _drafts/ folder with the slug name and then fire up my editor (NeoVim.)

Previewing Drafts on Localhost

Jekyll can preview drafts on the localhost. I run:

site serve

which executes:

#!/bin/sh

set -x
set -e

jekyll serve -D --watch

in a separate tmux pane. Jekyll is configured to watch for changes and rebuild the draft for preview.

Publishing

Once I’m happy with a draft it’s time to publish it (meaning promoting it from _drafts/ into _posts/.)

site publish whatever-the-post-slug-will-be

Which runs:

#! /usr/bin/env ruby
#
# Copy the file from the drafts folder, add the current date, and update the
# filename.  Remove any commented out lines from the front matter.
#

now = Time.now
draft = File.basename(ARGV[0], '.md')
draft_filename = File.join('_drafts', "#{draft_filename}.md")
post_filename = File.join('_posts', "#{now.strftime('%Y-%m-%d')}-#{draft}.md")
post = File.open(post_filename, 'w')

state = :start

open(draft_filename).readlines.each do |line|
  if (state == :start || state == :in_front_matter) && line =~ /^---/
    post.puts line

    if state == :start
      post.puts "date: #{now.strftime('%Y-%m-%d %H:%M:%S %:z')}"

      state = :in_front_matter
    else
      state = :body
    end
  elsif state == :in_front_matter && (line =~ /^#/ || line =~ /^\s$/)
    # Skip all the comment lines in the front matter
    next
  else
    post.puts line
  end
end

post.close

File.unlink(draft_filename) if File.exist?(post_filename)

This Ruby script:

  1. Adds the current date attribute to the Front Matter
  2. Removes all the commented out lines in the Front Matter
  3. Moves the file from the _drafts folder to the _posts folder and prefixes the current date to the file.

Deploy Updates to Production

With everything ready, it’s time to deploy the changes to the [site]({{ .Site.BaseURL }}). One last script:

site deploy

running:

#!/bin/sh

$_SITE_ROOT/bin/site build
rsync -crvz --delete-after --delete-excluded  _site/ wormbytes:/var/www/wormbytes.ca/

First we build the site:

#!/bin/sh

set -u
set -e

jekyll build

and then copy the _site/ directory up to the DigitalOcean production server, deleting any files that have been removed and updating any new files.

Aug 13, 2017

Podcast Subscriptions in Overcast

My brother-in-law asked me what podcasts I’m listening to and I didn’t have a good way of giving him my Overcast subscription list (since it’s not easy to share an OPML export.) Below is my current (as of August 2017) subscription list.

I 🌟’d my favourite shows.

Aug 12, 2017

Raising a Website from the Dead

Monty Python and the Holy Grail: Bring Out Your Dead

Over the past week I’ve been putting this website back together (using Jekyll and Minimal Mistakes.)

It’s been an adventure.

Back in 2005, I built WormBytes using a custom built static website generator written in Perl’s Template Toolkit. After a couple of years I had moved on to Ruby and I stopped updating the site.

In September of 2009 my wife, Roselle Kaes, and I found out we were to be parents. I felt this should be documented so I resurrected the site on WordPress.

The WordPress site was a short lived experiment (less than eight months!)

That’s where the site sat until 2016 when the super old computer I was using as a server (a machine that used to run my ISP Flarenet and which had been sitting in my parent’s basement) finally died.

WormBytes as a web presence ceased to exist. :(

A former coworker at ePublishing, Christopher Coleman, asked me to publish some of the software development practises we’ve developed at ePublishing. It’s a brilliant idea, but I had no where to put the articles.

Until now.

Aug 11, 2017

Let's Encrypt and Nginx on Ubuntu

A combination lock resting on a laptop keyboard

Configuring nginx to use SSL certificates from Let’s Encrypt using the Webroot method isn’t hard, but there are a few steps to make it all work. We assume:

  • you have only one website setup in nginx and that any additional sites will also use Let’s Encrypt for their SSL certificates.
  • HTML is served from /var/www/example.com

Prerequisites

  • Ubuntu 16.04
  • nginx
  • You must own or control the registered domain name that you wish to use the certificate with.
  • A DNS A Record that points your domain to the public IP address of your server. Let’s Encrypt requires this to validate that you own the domain. You will need an A Record for both www.example.com and example.com if you want to support both domains.

Step 1 - Installing Certbot

The easiest way to request a SSL certificate from Let’s Encrypt is to use the certbot. The Certbot developers have their own [Ubuntu] software repository with update-to-date versions of the software.

First add the repository:

sudo apt-get install software-properties-common
sudo add-apt-repository ppa:certbot/certbot
sudo apt-get update

You’ll need to press ENTER to accept the certbot repository.

Now install Certbot:

sudo apt-get install certbot

The certbot Let’s Encrypt client is now ready.

Step 2 - Create Nginx Configs

Let’s Encrypt uses a challenge system to ensure the domain for which the SSL certificate is about to be issued is controlled by the requester. To avoid duplicating the logic in every virtual host configuration (as we’re setting up both example.com and www.example.com) we’ll create a snippet.

sudo mkdir -p /etc/nginx/snippets/

Create /etc/nginx/snippets/letsencrypt.conf containing:

location ^~ /.well-known/acme-challenge/ {
	default_type "text/plain";
	root /var/www/letsencrypt;
}

Create the ACME challenge folder (as referenced above):

sudo mkdir -p /var/www/letsencrypt/.well-known/acme-challenge

We need to create the server specific dhparam.pem file. This will take a while:

sudo apt-get install openssl
sudo openssl dhparam -out /etc/ssl/certs/dhparam.pem 2048

Now, within /etc/nginx/conf.d we’ll create the global SSL settings. Create /etc/nginx/conf.d/ssl.conf containing:

ssl_session_timeout 1d;
ssl_session_cache shared:SSL:50m;
ssl_session_tickets off;

ssl_protocols TLSv1.2;

# Use the "Modern" cipher suite recommended by Mozilla
# https://wiki.mozilla.org/Security/Server_Side_TLS#Modern_compatibility
ssl_ciphers
'ECDHE-ECDSA-AES256-GCM-SHA384:ECDHE-RSA-AES256-GCM-SHA384:ECDHE-ECDSA-CHACHA20-POLY1305:ECDHE-RSA-CHACHA20-POLY1305:ECDHE-ECDSA-AES128-GCM-SHA256:ECDHE-RSA-AES128-GCM-SHA256:ECDHE-ECDSA-AES256-SHA384:ECDHE-RSA-AES256-SHA384:ECDHE-ECDSA-AES128-SHA256:ECDHE-RSA-AES128-SHA256';
ssl_ecdh_curve secp384r1;
ssl_prefer_server_ciphers on;
ssl_dhparam /etc/ssl/certs/dhparam.pem;

ssl_stapling on;
ssl_stapling_verify on;

# Enable HTST to ensure communication is only over SSL
add_header Strict-Transport-Security "max-age=15768000; includeSubdomains;
preload";
add_header X-Frame-Options DENY;
add_header X-Content-Type-Options nosniff;

Step 3 - Configure Domain to Respond to ACME Challenge

As we don’t have any SSL certificates yet, we need to configure our domain to respond to the ACME challenges. Assuming your nginx virtual server configuration is at /etc/nginx/sites-available/example.com.conf add:

include /etc/nginx/snippets/letsencrypt.conf;

between your server { ... } blocks.

Enable the site:

sudo rm /etc/nginx/sites-enabled/default
sudo ln -s /etc/nginx/sites-available/example.com.conf /etc/nginx/sites-enabled/example.com.conf

And then reload nginx:

sudo systemctl reload nginx

Step 4 - Obtaining an SSL Certificate

Request the certificate (don’t forget to replace with your own email address):

certbot certonly --webroot --agree-tos --no-eff-email --email YOUR@EMAIL.COM -w /var/www/letsencrypt -d www.example.com -d example.com

It will save the files into /etc/letsencrypt/live/www.example.com/

Note: The --no-eff-flag opts out of signing up for the EFF mailing list.

Step 5 - Setup HTTPS-Only Virtual Hosts

Now that we have the SSL certificates, switch your domain to HTTPS. Edit /etc/nginx/sites-available/domain.com.conf and replace the HTTP server configs with:

## http://example.com redirects to https://example.com
server {
	listen 80;
	listen [::]:80;
	server_name example.com;

	include /etc/nginx/snippets/letsencrypt.conf;

	location / {
		return 301 https://example.com$request_uri;
	}
}

## http://www.example.com redirects to https://www.example.com
server {
	listen 80 default_server;
	listen [::]:80 default_server ipv6only=on;
	server_name www.example.com;

	include /etc/nginx/snippets/letsencrypt.conf;

	location / {
		return 301 https://www.example.com$request_uri;
	}
}

## https://example.com redirects to https://www.example.com
server {
	listen 443 ssl;
	listen [::]:443 ssl;
	server_name example.com;

	ssl_certificate /etc/letsencrypt/live/www.example.com/fullchain.pem;
	ssl_certificate_key /etc/letsencrypt/live/www.example.com/privkey.pem;
	ssl_trusted_certificate /etc/letsencrypt/live/www.example.com/fullchain.pem;

	location / {
		return 301 https://www.example.com$request_uri;
	}
}

## Serves https://www.example.com
server {
	server_name www.example.com;
	listen 443 ssl default_server;
	listen [::]:443 ssl default_server ipv6only=on;

	ssl_certificate /etc/letsencrypt/live/www.example.com/fullchain.pem;
	ssl_certificate_key /etc/letsencrypt/live/www.example.com/privkey.pem;
	ssl_trusted_certificate /etc/letsencrypt/live/www.example.com/fullchain.pem;

  # The rest of your previous HTTP virtual server configuration.  Below is an
  # example:
	root /var/www/example.com;
	index index.html;
	location / {
		try_files $uri $uri/ =404;
	}
}

Finally, reload nginx:

sudo systemctl reload nginx

Note that http://example.com redirects to https://example.com (which redirects to https://www.example.com) because redirecting to https://www.example.com directly would be incompatible with HSTS.

Step 6 - Automatic Renewal using Cron

Certbot can renew all certificates that expire within 30 days. We’ll create a cronjob that automatically updates the certificates (and restarts nginx to pick up the changes.)

Let’s try a dry-run to ensure that everything is working:

sudo certbot renew --dry-run

Create /usr/local/sbin/letsencrypt.sh containing:

#!/bin/bash
systemctl reload nginx

# If you have other services that use the certificates add reloads here:

Make it executable:

sudo chmod +x /usr/local/sbin/letsencrypt.sh

Edit the root’s cron:

sudo crontab -e

And add:

20 3 * * * certbot renew --noninteractive --renew-hook /usr/local/sbin/letsencrypt.sh

Conclusion

And that’s it! If all went well you should see your site at https://www.example.com/!
Apr 15, 2014

Checking for Cookie Deletion by a Rails Controller with RSpec

Today I needed to prove that my Rails controller method deleted a cookie. After Googling for the answer (without success), I came up with the following.

Within your controller:

cookies.delete('cookie-to-delete')

In your controller spec you can check that the cookie was deleted with:

expect(response.cookies).to include('cookie-to-delete' => nil)

Rails sets the cookies to be deleted to a value of nil. By checking for the presence of both the cookie name with a value of nil, you can ensure your controller code deleted the cookie.

Apr 7, 2010

Mar 11, 2010

Nov 14, 2009

It's a Little Girl!

Today’s ultrasound went great! This was our first chance to see our baby as a baby (and not as a blob of blurry pixels.) The technician was great, and spent nearly 20 minutes with us taking all sorts of pictures. The very first photo told us that we’re having a girl.

I enjoyed this ultrasound as Natalie (the name we decided on for the baby) was very active and moving around. It was so fascinating watching her wave, and kick, and blink, and suck her thumb.

Only five more months to go. Can’t wait!

Sep 23, 2009

Ottawa Was a Blast

Our trip to Ottawa was a blast.  Rosey has posted a bunch of our photos online. It was nice to get away for a while. The drive up took 7 hours, but that’s because we stopped a lot (all the rest stops along the 401.) Once we got past Toronto, the drive actually wasn’t too bad. The scenery was absolutely beautiful, and it was great seeing the names of places I had only ever seen on a map.

Our hotel was right beside Byword Market, so we were able to walk everywhere we wanted to go. I really appreciated that as I did not want to drive.

Our first day of walking was to the National Art Galley. We walked past the American Embassy, which was very odd.  It looks like a prison with all the barred windows and gates. The funniest part was seeing the protesters on the other side of the road.

The art gallery was great.  Very big.  It took us a nearly three hours to go through the entire building. The rest of the week was spent exploring Byword Market and the shops around it.

On our last day we walked up to Parliament Hill and took a bunch of pictures. We have some great shots of the various statues, and the cat sanctuary.

Our drive back was less eventful.  Only took six hours. We made it back in time to get the cat from the vet before they closed, so our whole family is now back home.

Definitely was well worth the money, and it was a great way to escape what had been a rather trying series of months.

Sep 16, 2009

48 Hour Emotional Rollercoaster

The past 48 hours have been the most trying of my life.

It started Saturday night when Rosey yelled for me to help her in the bathroom. She was bleeding. A lot. Unfortunately, there was nothing I could do other than be there for support. We spent an hour in the bathroom and were positive that Rosey had miscarried. Finally, once all the bleeding had stopped, I packed her into the car and drove down to the local hospital.

We waited three hours for a doctor to examine Rosey and in that time we ran through the gamut of emotions. At 3am Rosey was examined, and the doctors were fairly confident that she had, in fact, had a miscarriage. They scheduled an ultrasound for Monday to confirm that everything had passed and that she was not at any risk of an infection.

Obviously, we were both completely devastated. Rosey’s pregnancy so far had been extremely difficult with her sleeping 18+ hours a day and unable to eat.  (She had lost nearly 10 lbs.) But we didn’t want it to end like that.

We talked a lot about our situation on Sunday, and Rosey was feeling physically better, which was at least a small positive.

On Monday afternoon, we went in for the ultrasound and received the surprise of a lifetime…

Our baby was still there! Heart still beating. It had not even moved!

Rosey was hysterical.

I was stunned.

What had just happened? How could Rosey lose that much blood and clots and everything be okay? All we had was questions, and no answers. The medical centre quickly scheduled us in for an appointment the next day. There they performed another set of tests on Rosey and everything looked good. No signs of any trauma.

The doctor were not able to explain what exactly had happened, and could not rule out a potential miscarriage in the future, but at the moment the baby is doing well, and Rosey is feeling a lot better. They’ve prescribed new medication to help alleviate her morning sickness and allow her to eat.

It’s a nerve wracking time for us now. We overjoyed that we hadn’t lost the baby, but so scared about what might happen. All we can do is try and stay positive. Whatever happens will happen and there’s not much we can do to prevent it.

Hopefully our trip to Ottawa this weekend will take our mind off the potential bad. I just want the rest of the pregnancy to go smoothly. No more scares. One normal, health baby at the end.

Sep 10, 2009

Going to Be a Daddy

So, yeah, going to be a daddy!  We’re very excited.  This is the week eight ultrasound.  Only 32 more weeks to go!

(I know there really isn’t much to see.  Sort of looks like a blurry set of pixels.  Later ones ought to be more focused.)

Feb 26, 2007

Jul 27, 2006

Local Photo Gallery

Rosey and I picked up a new digital camera a few weeks back (a Canon Powershot A540.) It’s a great camera, but we needed somewhere to post our pictures so our friends could see them. We started using Flickr, which is very slick setup, but they limit the amount of data you can upload in a month unless you’re a subscriber.

Well, there’s no point in paying for hosting when I all ready have a domain. Therefore, I installed Gallery at http://www.wormbytes.ca/gallery

The best part is that I can rsync the files from my desktop to the server and then import those photos directly into the gallery. Nice and easy.

Jul 9, 2006

Kaes Family Portraits

My grandfather (Henry Kaes) supplied me with a bunch of old photos of various members of my family. I’ve collected them here with as much documentation as possible so that my children (some day), will know their family story.

Family Portraits

Ferdinand Kaes standing in a field Portrait of Ferdinand Kaes Ferdinand Kaes with Grandchildren Ferdinand Kaes with More Grandchildren Kaes Family by Wall

Jul 4, 2006

ACM Professional Development Centre

For many years I wanted to join the ACM, but I never had the money (first as a starving student, and then as a starving small-business owner.) Last December, however, I began work at ePublishing so I decided to take a bit of my salary and join both the ACM and the IEEE. Both organizations are a great idea for anyone working in the computing industry.

While I’ve gotten a lot out of my IEEE membership, I absolutely love the ACM Professional Development Centre —especially the free online books offered to all members.

The ACM offers access to both O’Reilly’s Safari® Enterprise Library and SkillSoft’s Books24x7. I still have a large collection of books I’ve purchased, and I will continue to purchase new books in the future, but for the price of one or two hardcover books, I can have access to a full library for a year. It’s a great way to discover whether a book is good enough to own.

If you are trying to stay current with what’s happening in this industry, I would highly recommend becoming a member of both the ACM and the IEEE.

Jun 28, 2006

Jun 25, 2006

jQuery - A Slimmer Prototype

For the past year or so I’ve used the JavaScript library Prototype to make coding in JavaScript more pleasant. Today, while reading A List Apart, I came across a reference to a new library, jQuery. Initial impressions are favourable.

Unfortunately, like Prototype, trying to read the source code for this library/extension is extremely complicated. I’m hoping this is just due to my lack of JavaScript guru-ness, since it seems like one needs to be a guru to understand what the code is doing. At least the documentation is clear for an end-user.

Jun 21, 2006

May 15, 2006

Relaying Mail through Sympatico Using Postfix

Customers of Sympatico’s high-speed Internet service receive instructions on how to set up their email; however, these settings are aimed at people using Outlook, Netscape, or Eudora. What I needed were instructions on how to configure my local SMTP server, Postfix, with Sympatico. Of course, that information is not available. This document details how I figured out the settings required to make smtphm.sympatico.ca happy.

Installation

You need a version of Postfix built with TLS and SASL support enabled. If your distribution doesn’t come with it pre-built follow the instructions at:

On my Debian unstable system I simply did:

apt-get install postfix libsasl2-modules

Configuration

I’m assuming that your Postfix configuration directory it /etc/postfix. Adjust appropriately to accommodate your system.

To use SASL we need a password file containing our user name and password for the server we are connecting to. Per Sympatico’s instructions the server is smtphm.sympatico.ca.

cd /etc/postfix
mkdir sasl && cd sasl
echo "[smtphm.sympatico.ca] USERNAME@symaptico.ca:PASSWORD" > passwd
postmap hash:passwd

The above creates the password file and the hash-based database file that Postfix uses. Of course replace USERNAME with your [% symaptico %] user name, and PASSWORD with your password (the email password, not the b1 password to access the Internet.)

Make sure in your main.cf you have configured your relayhost as: relayhost = [smtphm.sympatico.ca]

Finally, add the following lines to your main.cf file:

# Enable TLS/SASL for the smtphm.sympatico.ca server
smtp_use_tls = yes
smtp_tls_note_starttls_offer = yes
tls_random_source = dev:/dev/urandom

smtp_sasl_auth_enable = yes
smtp_sasl_password_maps = hash:/etc/postfix/sasl/passwd
smtp_sasl_security_options = 

Restart Postfix and send a test message. If all went well you should see the successful sending of the message in the Postfix log file.

Good luck!

Jan 23, 2006

Web Application Development with FireBug

While reading various blogs online I came across a post mentioning a great Firefox add-on called FireBug. According to the author’s write-up:

FireBug is a new tool that aids with debugging Javascript, DHTML, and Ajax. It is like a combination of the Javascript Console, DOM Inspector, and a command line Javascript interpreter.

I would highly recommend this add-on for anyone doing “Web 2.0” development.

Jan 16, 2006

Programmer's Library

Every working programmer or software developer ought to have a large personal library of books they consider essential–these books are mine. My list started off being very language heavy (mostly Perl), but as I’ve gotten older (and gained more experience) I’ve gravitated towards broader topics in software development.

Programming

Languages

ASP.NET

C/C++

Clojure

Perl

Regular Expressions

Ruby

Development

Foundation/Theory

Hardware

System Administration

Graphic Design/Usability

Others…

Jan 16, 2006

Reading List

I try to read a variety of books. In the past the local library was down the street from where I lived, but now I prefer reading ebooks (either purchased or borrowed.)

There is a large gap where no books were recorded while the site was offline: a regret as I know I read during those periods.

(If you’re a programmer or developer, check out my collection of programming books.)

January 2024

December 2023

November 2023

October 2023

September 2023

July 2023

April 2023

February 2023

January 2023

December 2022

November 2022

October 2022

September 2022

August 2022

June 2022

May 2022

December 2021

September 2021

August 2021

May 2021

April 2021

March 2021

February 2021

January 2021

August 2020

May 2020

August 2019

June 2019

February 2019

January 2019

October 2018

September 2018

August 2018

July 2018

June 2018

May 2018

April 2018

March 2018

September 2017

August 2017

July 2017

December 2016

November 2016

July 2016

December 2009

May 2009

February 2007

September 2006

June 2006

February 2006

January 2006

December 2005

November 2005

Dec 14, 2005

Telecommuting to Work Now

For the past week I’ve been employed as a Perl web application developer at chaffee::interactive. It’s been an interesting week. I’m now starting to get the hang of the development environment. A lot of the code is older, so I’ve been spending most of my time updating the code.

It’s a great job, and I love the fact that I telecommute to work. It’s especially nice when I wake up in the morning and see a foot of snow.

Dec 2, 2005

Wormbytes::CGI::Application

I’ve done a lot of CGI application programming. Over the years I’ve developed a CGI::Application base class that I derive my applications from. I’ve called my Perl module WormBytes::CGI::Application since it derives from CGI::Application. It brings in all the modules I normally use in my CGI programming.

In addition to the required modules, I’ve extended the class to handle session management. There is also rudimentary support for user management in the base code. Nothing fancy, but enough to do simple log-in style applications. It can be easily extended in sub-classes if needed.

The session management code uses a UUID numbering system. The idea is that each session ID needs a unique ID, but the IDs do not need to be random. Uniqueness is more important. To ensure that sessions can not be hi-jacked, an additional HMAC cookie is included with the session ID cookie. This HMAC includes a random number stored in the session on the server plus a hash of information from the client. The client information is not required, but it does help if the information is present. Because of the random key that’s used in the hash it is impossible to guess what the HMAC will be. It is checked at the beginning of each request and modified at the end of each request. Therefore, the HMAC is constantly changing and is constantly validated. In this, the base class, an invalid session causes the system to log the user out.

There are also certain helper functions like tt_pre_process() that adds certain objects and variables to all templates. cgi_untaint() creates a CGI::Untaint object for later use. Finally, redirect_url() simply redirects the client to a new location.

I find this module to be a great base for all my CGI applications.

Dec 2, 2005

Perl Programming Sample Work

I had an interview for a Perl programming position the other day, but I got stuck on their request for sample code showing my Perl programming skills. I have done Perl programming for eight years, but their requirements for sample work did not seem to match anything I had done. I finally found something I could show, but I wasn’t entirely pleased with it. Therefore, I posted a meditation to Perl Monks asking how they would Show Sample Source Code without Modules

Maybe my fellow monks can offer some suggestions for next time. (All though, I would really like to get the job I interviewed for.)

Dec 2, 2005

Emacs Lisp

Emacs is my editor of choice, and like most people who use Emacs I have customized it to suite my personal taste. I have included copies of my customizations so that others may build on what I’ve created, or simply have a more pleasant working environment.

Lisp Source

emacs.el

This is my main .emacs file. It contains the bulk of the customizations, but it does include a few other features and functions that other people may find useful. Some of the code is written by me, and other parts I’ve found on the net.

planner-config.el

To help me manage my time and my projects I have turned to the plannel-el (PlannerMode) major mode. Since I have worked as a independent IT consultant, I often need to track the number of hours I work on projects for various clients. I have customized and extended planner-el to allow me to clock in and out of a task. Upon clock-out the system will automatically prompt me for a description of what I did during the clocked-in time, and then write a note on the task page for the project detailing the amount of time I spent, and allowing me to classify the work performed. I then have a separate Perl script that takes the raw task pages and produces an invoice. I think it’s a very slick setup.

pic-asm-mode.el

I have done a lot of firmware programming on various Microchip PIC micro-controllers, and I found that the default asm-mode.el script did not handle the idiosyncrasies of the PIC assembly language very well. Therefore, I created pic-asm-mode.el as an extension to asm-mode.el. It syntax highlights PIC assembly mnemonics and handles formatting correctly.

Dec 1, 2005

Perl Best Practices - POD Revisited

Damian Conway gave a tutorial in 2004 titled “Best Practices Perl” that describes a series of best practices concerning programming Perl applications. (Mike Kruckenberg wrote up a review of the presentation.) I agree with most of his points, but I do have a bit of a problem with the section of POD documenting. Damian mentions that: “put POD after END since the parser doesn’t have to parse the POD.”

I can agree with Damian’s point about not needing to parse the lines, but normally you would have comments there anyway. I believe it’s better to have the documentation in POD format rather than as comments. There is no appreciable difference in parsing speed between parsing POD and parsing comments.

Damian’s point that POD documentation at the end does not need to follow the layout of the code does have merit, but I believe it is outweighed by the need to keep code and documentation in sync. With the documentation as close as possible to the actual code it is easier to keep them aligned.

Finally, if performance is most important then all POD and all comments should be stripped from the files before placing in production. This would eliminate all parsing time. I would argue that this may be a good trade-off in specific instances, but not in general.

All told, I would recommend any Perl programmer picking up a copy of Damian’s book Perl Best Practices and incorporate those ideas they feel comfortable with. Highly recommended.

Nov 30, 2005

Combo Button Lock Quiz Problem

Introduction

Matthias Wandel of Research in Motion (RIM) has a programming challenge posted on his website. The challenge is to write a program that generates all the possible combinations for an N button combination lock. The twist is the multi-button possibilities as well. Read on to see how I solved the problem.

Updated on November 29, 2005: The version described below is the second published version of the code. The first program was 160 lines of code and involved a more complicated way of producing the combinations. It is, however, faster than the current version.

Constraints

Matthias presents the programming challenge while describing the position of an embedded developer. The original code traded memory usage for more complicated code. The new version reverses this decision since the amount of memory consumed is still much lower than a typical 8-bit micro-controller. The other driving constraint is to keep the source to less than 100 lines of code. The current version is at 125, so there is still some room for improvement.

Theory of Operation

The problem can be described as a simple combinatoric (k-of-n) where an increasing number of keys are drawn (starting with one and increasing to a maximum of eight.) After each choice the permutations of the set are generated. Pretty straight forward.

The insight I had for the second version of the program is to pre-compute all the button pair combinations. With only eight possible keys, there are only:


total_pairs = (total_keys * (total_keys - 1)) / 2
            = (8 * (8 - 1)) / 2
            = 28

Therefore, there are 28 pair combinations plus eight single key presses for a total of 36 possible button presses. Now, I can consider the whole single versus pair problem as a simple k-of-36 with k increasing from 1 to 8. This simplifies a lot of the code.

Pairs are stored in a single integer as the upper and lower nibbles of a byte. Single buttons are also stored in an integer, but the upper nibble is zero to differentiate them from the pairs. The display routine uses this information to determine how the output should be handled.

In order to ensure that invalid combinations are not picked a simple bitmask is used to track the keys already used in the current combination. This decision does slow down the program a bit (with my tests showing the current code calculates all the combinations and permutations for eight keys in 4.6 seconds, while the older code could do the same in 2.9 seconds.)

I’m not happy about the slowdown in the execution, but the code is easier to understand, and the change did eliminate 35 lines of source code.

Source Code

The complete source code for combos.c can be compiled into an executable by doing: cc -o combos combos.c

Conclusion

I found the process of writing this application to be fascinating. I had never developed code requiring either permutations or combinations. Even after I wrote a version that solved the problem I still felt compelled to come up with a better version. At 125 lines, this version is closer to meeting the requirements of the challenge, but it’s still not enough. I’ll have to come back to this problem again.

Nov 16, 2005

Still Looking for Work

After selling my business at the beginning of June, and getting married at the end of June, I am now looking for full-time work in the Simcoe and surrounding area. During the past few months I’ve done some consulting work for various companies, but unless a bunch of large consulting jobs materialize, I would much rather work for a stable company looking for a highly skilled IT professional.

My job search in the Simcoe area has been a bit frustrating, but I am hopeful that something will come along soon. I love Simcoe, and I would hate to have to leave simply because I could not get work in my chosen field. Far too many young people have left this community because of lack of opportunity. I don’t want to be the latest casualty.

So, if any of you know of any company in the Simcoe (or surrounding area) who could use my skills please let me know. Thank you.

Oct 14, 2005

Eight Traits of a Creative Person

The following traits were listed in “Pencil Dancing” by Mari Messer as an example of what creative people posses. The author goes on to state that the reader should copy the list and then hilight the traits the reader currently possesses in one colour, and the traits they wish to further develop in another colour. The traits are posted where they can be daily seen, and a log is kept of the progress. From time to time the chart should be updated to reflect your current creative profile.

Courage

  • You’re not afraid to fail.
  • You think independently; you’re not overly influenced by others’ opinions.
  • You have confidence in your own abilities and insights.

Tenacity

  • You possess unwaning energy and enthusiasm.
  • You persevere despite difficulties.
  • You finish what you start.

Sensitivity

  • You’re open and receptive to new ways and ideas.
  • You’ve sensitive to a need or opportunity.
  • You have a keen awareness of your surroundings and of other people.

Flexibility

  • You’re not locked into doing things a certain way.
  • You’re quick to compromise and willing to try a new approach.
  • You’re eager to broaden experience by listening to other people’s ideas.

Originality

  • You have the ability to generate many unique answers to a single question, problem or situation.
  • Your creativity is a true expression of your real self.
  • You don’t strive to be original, but you naturally are.

Good Judgement

  • You can recognize a good idea or a bad one.
  • You show realistic insight.
  • You’re willing to test ideas in the real world.

Broad Experience and Skills

  • You show competence in a least one chosen field.
  • You have many interests.
  • You’re an articulate and persuasive communicator.

Playfulness

  • Your sense of humour is infectious and not harmful to others.
  • You honour the spirit of exploration and curiosity.
  • You’re not ashamed of your ability to fantasize, dream and imagine.

Jun 22, 2005

PICtach

Introduction

LED side of the pictach

In 2004 I finally had to purchase another car since my old boat (a 1980 Oldsmobile Cutlass Supreme) had finally bitten the dust. I looked around and found a 1997 manual 5-speed Chevy Cavalier. Great. It had been a while since I had driven a stick-shift, but I looked forward to it. One problem though: no tach. Now, I don’t actually need a tach to drive stick, but it’s sure nice to have. The project below was my attempt at building a tach for my car.

The project was never finished because in the fall of 2004 I rolled the car. (I survived without a scratch, but the car was totalled.) I did not finish the project because the replacement car already had a built in tach. The code to display the LEDs worked, so I got what I wanted out of the project.

Design

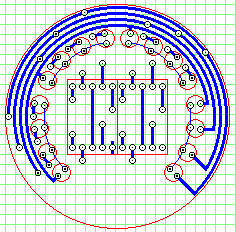
Schematic of the LED circuit board

The heart of the pictach is the Microchip PIC18F242. I chose this controller because I had it laying around my work area. The PIC’s spec sheet states that it can sink (or source) 20mA per output pin. That is plenty to drive an LED; however, there are sixteen individual LEDs, plus the seven segments per numeric LED. Now the design decisions begin because first, the PIC doesn’t have that many output pins and second, even if the PIC had that many pins, there is no way it could source (or sink) that much current if all the LEDs were on! (The spec sheet states a total current draw of 300mA.)

Picture of the two halves of the PICtach joined together.

To keep the total current draw down, I decided to only illuminate one LED at a time plus one 7-segment LED. Therefore, the total current draw is under 100mA. By rapidly flashing the appropriate LEDs it creates the illusion that they all on at the same time. (Persistent of vision and all that jazz.)

My other design decision was based on multiplexing the LEDs. My PIC did not have sixteen free outputs to drive the various LEDs. I separated the LEDs into four banks of four LEDs. Four output pins connected to the four banks as the return path. The other four output pins from the PIC were connected in parallel to the same LED in each bank. (The first LED in each bank had their anodes connected together.)

PIC side of the PICtach

To turn on an LED the anode for that position is brought high while the cathode for the bank is driven low. All the other cathode outputs are held high so only the selected LED position from the selected bank is on. Therefore, only eight outputs are needed to drive sixteen LEDs.

The two 7-segment numeric LEDs were wired in a similar manor. The seven segments are connected to seven outputs from the PIC, and each numeric LED has their cathode connected to two more outputs from the PIC. By driving the cathode of the appropriate numeric LED low I can select which numeric LED to display. They are alternated rapidly to give the impression that both were always on.

Firmware

The source code for the tach is written in assembly. This was one of first PIC projects I developed, so it shows the immaturity of my PIC coding style. I would do things differently if I was developing the code now. The pictach source code is released to the public under the GNU Public License.

Conclusion

Perhaps someday I’ll finish this project and package it into a device for a few of my friends. The basic idea works exceedingly well, and I’m pretty pleased with the design.

Jun 21, 2005

Jun 20, 2005

SpamAssassin Additions

Delivery Scripts

I've written a shell script that handles local delivery of email in a qmail environment.

To use the script you would place it in your .qmail file similar to this:


.qmail:
  |/usr/local/bin/spamassassin.sh

Of course, use the correct path to the script on your system.

I wrote this script (rather than using ifspamh) because I needed a way to delete high scoring messages that could be customized by the end user. In addition, I didn't want to store the full message in memory like ifspamh does.

Required Software

The following packages are required to be installed and working correctly for the spamassassin.sh to work properly:

spam_bounce

The above shell script does rely on one extra program called spam_bounce. This program takes an email address on standard input and returns a numerical limit for that user on standard output. If there is no numerical limit for the supplied email address, it must return 0. The score returned by spam_bounce is used to determine whether to deliver the message or to delete it. Any email messages scored by SpamAssassin higher than the value returned by spam_bounce will be deleted from the user's mailbox. The default bounce score is defined in spamassassin.sh as 13.75.

I separated the spam_bounce functionality out of the main delivery script because different people would have this spam score limit information stored differently. The simplest method would be to have a shell script that looked up the information is a flat text file. On my system, I have a C program that retrieves the information from a MySQL database where all the SpamAssassin user preferences are stored.

Custom Rules

The local rules used by the Flarenet mail server are updated on a daily basis. I'm using a new system where I annotate when each rule was added or modified and why.

Local SpamAssassin Rules

Jun 20, 2005

Battery Charging Monitor

Image of the battery charger monitor within the cabinet.

Introduction

A local manufacturing company contracted me to develop a battery charger monitor. Their forklifts are all battery operated, so they are constantly charging these batteries. Unfortunately, their existing battery charger did not include a means of monitoring the voltage going into the batteries, so they often overcharged and cooked the batteries. Not good. The device I developed monitors the battery’s voltage and when it reaches the “charged” limit automatically switches the charge into trickle charge mode.

There are two additional protections:

  1. The unit auto-starts at the presence of a battery. It waits an additional three seconds before starting the charger to ensure that battery is fully connected and that the operator has moved away from the contacts.
  2. Eight hours after the monitor is activated turn off all charging to the battery. This prevents the battery from being cooked by over-charging.

Hardware

Close-up of the battery charger monitor within the cabinet.

The hardware design is very simple. The controller is a Microchip PIC12F675. It monitors the voltage via it’s analog to digital converter. From there it drives two relays (via transistors) that control the full- and trickle-charges. A built in timer driven by the TMR0 interrupt keeps track of the seconds since activation.

The system is powered from the voltage charge on the battery (28V nominally.) The relays are driven from a 12V regulator, while the PIC is driven from a 5V regulator. The voltage across the battery goes through a resistor divider and then into the PIC’s input. The divider is to keep the input voltage below 5V. I also added a 5.1V zener diode to protect the input should one of the resistors fail.

An Aside about Voltage Regulators

I often need to use voltage regulators in my designs to produce the proper voltages for the micro-controllers. Often I have 24VDC present, but the PIC (or AVR) nominally need 5VDC. I’ve found that going from 24VDC to 5VDC through a regulator like the 7805 does not work very well. The 7805 becomes very hot and then goes into thermal shutdown.

Why does this happen? Ultimately a regulator works by internally dropping the difference between Vin and Vout. By looking at the 7805’s spec sheet you would think you could feed in a maximum of 30VDC while drawing 1.5A and produce a well regulated 5VDC out. If you try it you’ll find out what I did: that it doesn’t work, and you’ll burn your finger if you touch the regulator!

If you read the spec sheet further you’ll find that without a heat-sink a 7805 can dissipate around 6W (max!) at room temperature. Let’s do a little math here. Given:

V(in) = 24VDC
V(out) = 5VDC

The 7805 is, therefore, internally dropping:

V(drop) = V(in) - V(out)
        = 24VDC - 5VDC
        = 19VDC

Now, given the 7805’s power dissipation at room temperature is 6W, how much current can be drawn?

P(room) = 6W
V(drop) = 19VDC
I = P / V
I(max) = P(room) / V(drop)
       = 6W / 19VDC
       = 316mA

Last time I checked, 316mA is well below the 1.5A rating. Also, you’re at the absolute limit of the heat dissipation of the 7805, so you’re likely to toast it if you come anywhere close to drawing 300mA. Hence you either need a good heat-sink, or use some other means of dropping Vin.

Conclusion

Since I implemented and installed this battery charger monitor, the company has reported that they have not had any problems with overcharged batteries, and that their existing batteries are lasting longer. I consider that a success all around.

Jun 20, 2005

Machine Production Monitor

Photo of the production monitor mounted on the electrical cabinet.

Introduction

I was asked by a local manufacturing company to come in and help them retrieve production information from a department of nipple machines. The production information is gathered in real-time before being integrated into their existing AS/400 payroll system. Hardware wise, they needed twenty-four production monitors (one monitor for each machine) and one CAN-to-serial bridge for the central server. It was my job to design the hardware, program the firmware, and then write the code to aggregate the data before inclusion into the AS/400. Finally, I updated their COBOL payroll system to use the newly gathered data.

I had no idea what I was getting myself into when I started this project. I had only done personal projects involving embedded controllers, and I had no experience with the CAN protocol or LCDs. Finally, I had never worked with an AS/400 system, nor had I done any COBOL programming. All of this was new to me, but I agreed to do the project because the client needed the information to get a handle on production losses and I wanted a project to improve my programming and designing skills.

This was a multi-month project with a tonne of unique challenges. Below describes what I encountered and how I solved them. There are probably a few lessons in here for other people as well.

Requirements

The requirements for the project were as follows:

  • Display current cycle count and previous cycle count to the machine operator.
  • Store and report cycle information during power outages.
  • Bring production data from out in the plant into the office.
  • Integrate collected data into existing AS/400 payroll system.

Environment

Landis nipple machine

Each Landis nipple machine is attached to a Syntron vibratory feeder. This presents a unique challenge, since the Syntron works by chopping a three phase 600VAC signal. During half the cycle the bowl is pulling in and during the second half the spring is released. This chopping action produces a huge amount of electrical noise in the area around where the production monitor needs to operate.

In addition to the electrical noise produced by the Syntron, the Landis machines themselves have large electric motors which are under a varying load. Multiple times per shift the machines are turned on and off, so there are power spikes during power-up.

Because the Landis machines are threading steel, there is a tremendous amount of steel filings everywhere, and all the machines are operating with large amounts of oil covering every part of the machine.

Finally, the whole plant is a delta plant, meaning no common ground anywhere. Therefore, all the EMI generated by all the motors and wave chopping units has no path to ground, so it radiates in all directions. This plant is a nightmare to keep electronic devices working. There are professionally engineered PLCs that are constantly losing their firmware because of the amount of electrical noise in the environment. This was my biggest challenge in designing robust micro-controller monitoring units, and in networking these units to a central server located in the office.

Design Decisions

Inside of the production monitor showing the components.

I decided on using a Microchip PIC18F248 as the micro-controller for the production monitors because of it’s built-in CAN support. As mentioned, the operating environment is electrically noisy so I needed a network with a high common-noise rejection design. CAN looked like the best option, so I went with it.

With the micro-controller and network decision out of the way, I proceeded to design the motor load input system and the grip detection system. These Landis machines produce one part by threading one side of the part with one set of cutters, picking the part up, and then threading the rest of the part with a second set of cutters. Therefore, the client defined a “cycle” as a part moving through both cutters. This meant I had to track the status of both grips (which hold the part during the threading process.)

Fortunately, each Landis machine is controller by a small PLC, so I was able to tap into some of it’s outputs for tracking the grips, and to also know when the motor was running, and whether the Landis was in run-mode or manual-mode. Only run-mode cycles counted, so I had to know the difference.

To complete the data acquisition on the network I developed a CAN-to-serial bridge. It’s only roll is to listen for CAN messages on the network and to then translate them to a PC through the RS232 port. It also does the reverse (takes messages from the PC and places them on the network.) I designed the bridge hardware, wrote the firmware, and developed the interface code for the Linux PC that acted as the central data gathering and control point for the network.

The software on the PC was written in Perl and I utilized a PostgreSQL database to store and analyze the incoming data.

The last part of the project was the integration of this newly gathered data into their existing AS/400 COBOL based payroll system. Ultimately, it involved writing about 50 new lines of COBOL code in each of five applications. Finding what lines to add, and where to insert the new logic was a challenge since the majority of the code was not commented, variables were cryptically named, and the original author was no longer available to question.

Conclusion

The project took a lot longer than I had originally expected, but I learnt a tonne working through all the challenges. I now have a much better handle on hardened industrial design. I understand the CAN protocol much better, and how to work with LCDs. I have AS/400 experience (though I find it to be an odd platform) and I know how to program in COBOL (which I hope not to repeat.) All in all it was a fascinating journey.

I am also pleased to report that the customer is extremely happy with the results of the production monitors. They report that the material losses have dropped substantially since the monitors were installed.

Apr 28, 2005

Time Management with planner-el

In the past I was not very good at time management. There were always tasks I should be performing, but I did not always get to them as quickly as I should. Plus, there would be the occasional task I would forget about completely. Finally, it was not a good use of my limited brain power to keep track of the tasks yet to be completed.

In order to manage my time better, I’ve been looking into various tools. The simplest: a plain piece of lined paper. All the tasks are written onto this “Master Todo List” and as you finish the task you strike a line through it. It works, but it doesn’t scale very well. Plus there is a limited amount of space to write if you try to go one task per line.

What I really wanted was a program to handle this book-keeping for me. I initially thought I would write my own, but that seemed like a poor use of my time, so I investigated other programs out there. One of the requirements is that it run under Linux. After much searching I came across planner-el, which nicely integrates into my Emacs editor.

After playing around with it for a few weeks I’ve made a few tweaks to improve my time-tracking ability. The following Lisp function builds on the planner-timeclock.el module to log the time spent on a task on the task’s page.

;;
;; Add additional support for logging what happened while clocked into
;; a project.
;;
(defvar my-current-task-info nil
  "Full information about the currently clocked in task.")

(defadvice planner-task-in-progress (after planner-timeclock-note activate)
  "Store the full information about the current task on clockin."
  (setq my-current-task-info (planner-current-task-info)))

(defadvice timeclock-out (around planner-timeclock-note activate)
  "Create a note in the for the task describing what happened during
the clocked-in period."
  ad-do-it

  ;; Now try to add the note for the task
  (when my-current-task-info
    (planner-create-note (goto-task-page my-current-task-info))
    (insert
     "<*:" (timeclock-seconds-to-string (timeclock-last-period) t) ">"
     " "
     "Clocked out of task "
     (format-time-string "%Y/%m/%d %H:%M:%S" (current-time))
     "\n\n")

    ;; clear the task since we're now logged out
    (setq my-current-task-info nil)
    )
  )

(defun goto-task-page (info)
  "Redirect either to the plan page for the task, or failing that
the day page.  Returns the task page selected."
  (let ((plan (planner-task-plan info))
         (date (planner-task-date info)))
    (if plan
        (planner-goto-plan-page plan)
      (planner-goto date))
    (or plan date)))

With the above timeclock “notes”, I can write a simple script to parse those lines and turn them into an invoice for a customer (or just myself.) I love Emacs!

Mar 30, 2005

ASP.NET HTML Complaints

One problem with ASP that I’ve discovered is that a lot of the web controls do not produce W3C compliant HTML. This is an issue for me. I think it is very important that all new web sites adhere to the relevant standards. I don’t know if this problem is only in Visual Studio 2002 (the version I’m using), but I do need to find a way to solve the issue if I want to use ASP in any sites Brett and I do. Hmm…

Mar 29, 2005

Learning C# and ASP.NET

Brett would be so proud of me. Over the past couple of days I’ve been learning C# and ASP. C# has that Visual Basic tinged Java feel to it, while ASP seems unlike anything else I’ve worked with before.

While I’m not a big fan of Java, I think I might be able to tolerate working with C# and ASP. Brett has talked about us doing some Windows application, so these technologies should make that part easier than coding with either MFC (shudder) or the raw Win32API. The part I’m not thrilled about is the 25MB .NET download. I know it will be part of future Windows releases, and that most people have already downloaded it through Windows Update, but I still have a problem requiring a 25MB download just to use an application I write for Windows.

I guess it’s trading a huge-client size download against the lowered development time and effort. Maybe I’m just being old fashioned. In this age of multi-gigabyte hard drives, 25MB doesn’t seem that bad. There is definitely a contrast between when I develop for Windows and when I develop using industrial micro-controllers (like the Microchip PICs, often with less than 16KB of total program space!)

Mar 17, 2005

Exploring Ruby

I looked into Ruby on Rails a few weeks ago after seeing it discussed on Slashdot and Perl Monks. There are some interesting ideas in Ruby on Rails, so I thought it would be a good idea to explore Ruby itself. It feels very much like Perl, as members of Perl Monks have mentioned in other posts there.

To get my head around Ruby I looked at the free online book, Programming Ruby. It’s a very easy read, and I think I got up to speed fairly quickly. I don’t think Ruby will replace Perl as my language of choice right now, but I do admit to being intrigued by the idea of passing blocks around. It feels very natural.

I’ve stolen a few ideas from Ruby on Rails that I have now reimplemented in my Template Toolkit based webapp framework. Good ideas are good regardless of the language.

Mar 15, 2005

Mar 14, 2005

Mar 13, 2005

Added Blogroll

I spent some more time tweaking my Template Toolkit templates and scripts to allow me to generate the update entries in a consistent manner. I have one WRAPPER template fragment that generates the blog-entry HTML and then the index.html template for the site grabs the five most recent entries to display on the page.

I also added a new Emacs binding to help generate the timestamp for the entry. Two key-strokes later and I have the correct entry. The Emacs Lisp I use in my .emacs is:

(define-skeleton datetime-in-t-format
  "Return the current date/time in T-combined format"
  (interactive)
  (format-time-string "%Y%m%dT%H%M%S"))
(global-set-key [?\C-c ?\C-w] 'datetime-in-t-format)

The entries are placed in the blog directory and then my index.html template processes the five more recent with the following Template Toolkit code:

# Grab the five most recent blog entries
USE dir = Directory('./src/blog', recurse=1);
SET count = 5;
FOREACH subdir = dir.dirs.reverse;
  FOREACH file = subdir.files.reverse;
    NEXT IF file.name.match('~$');
    SET blogpath = "blog/${subdir.name}/${file.name}";
    PROCESS $blogpath path = blogpath filename = file.name;
    count = count - 1;
    LAST IF count == 0;
  END;
  LAST IF count == 0;
END;

It’s a nice easy system for me to update the entries on the site.

Mar 13, 2005

Site Design

Finally, an updated design and logo for WormBytes. Every since I spun the consulting part of my job out of Flarenet, I’ve felt I needed a new design and unique logo. Well, today I found a spare few minutes to develop the little worm in the corner to go with the updated colour scheme and layout. Everyone seems to think he looks cute. I haven’t named him yet of course.

The updated site is a collection of static pages. However, I do use a bit of programming to bring everything together. To ensure a consistent look I use Template Toolkit to process a bunch of HTML fragments. Since I already use TT for dynamic websites, it makes sense to leverage the same technology to produce this site.

I have plans on updating this page often (like a blog, but let’s not call it that.) If you have any suggestions on what I should post, let me know.

Mar 12, 2005

Additions for Qpsmtpd

Plugins

These plugins are used daily by the Flarenet ISP mail server, but I have not submitted them to the Qpsmtpd maintainers. As always, use these plugins at your own risk. They work for me, but as far as I know I'm the only one using them.

check_badpatterns
Use the existing badmailpatterns and badrcptpatterns control files from the SPAMCONTROL patch.
check_domain_regexp
Compares the reverse DNS (the host/domain name) against a collection of regular expressions.
check_goodrcptto
Allow (or white-list) certain email RCPT TO email addresses or users. This is useful for allowing postmaster and abuse mail through.
rblsmtpd_env
Mimics rblsmtpd functionality with respect to the RBLSMTPD environment variable.

Pending Patches

The following patches have been sent to the Qpsmtpd mailing list, but are not currently part of the Qpsmtpd distribution. The date in brackets is the day I submitted the patch.