Worm with Glasses

Coding • DevOps • Personal

May 4, 2023

Yggdrasil VPN

I’m trying to work outside my home office more, but all my email is hosted on my home server. While disconnecting is nice, not having access when I need it has sucked.

Enter yggdrasil!

After installing on my laptop (MacOS) and my desktop (Ubuntu) I updated .ssh/config with my desktop’s IPv6 address and was able to SSH via IPv6 over my local network. Perfect!

Step two: install on a server with a public IP. One more service running on my Digital Ocean instance.

I’m not interested, at the moment, with joining the full yggdrasil network, so I configured my public instance to only allow peering from my laptop and desktop’s public keys:

  AllowedPublicKeys: [
    "desktop-public-key"
    "laptop-public-key"
  ]

On the public server, I listen via TLS rather than plain TCP. It’s slightly slower, but also slightly more secure. Since I’m not moving a lot of traffic over the connection, the extra security is worth it to me:

  Listen: [
                  tls://PUBLIC-IP-ADDRESS:56603
  ]

I couldn’t find a recommended port to listen on, so I picked a random number. 🤣

(The only “gotcha” was remembering to open the firewall for yggdrasil.)

Ramces Red’s article about yggdrasil has more information about installing and configuring a basic VPN.

Jan 8, 2023

Function Key Snipping with Raycast

Max Gorin posted You’re using function keys wrong where he describes using function keys as a quick launcher!

So, here’s the trick: assign each of your top-12 most used apps to an F-key.

Max uses KeyboardMaestro to show/hide the apps, but we can do the same with Raycast (which I already use, and it’s free.)

Step 1

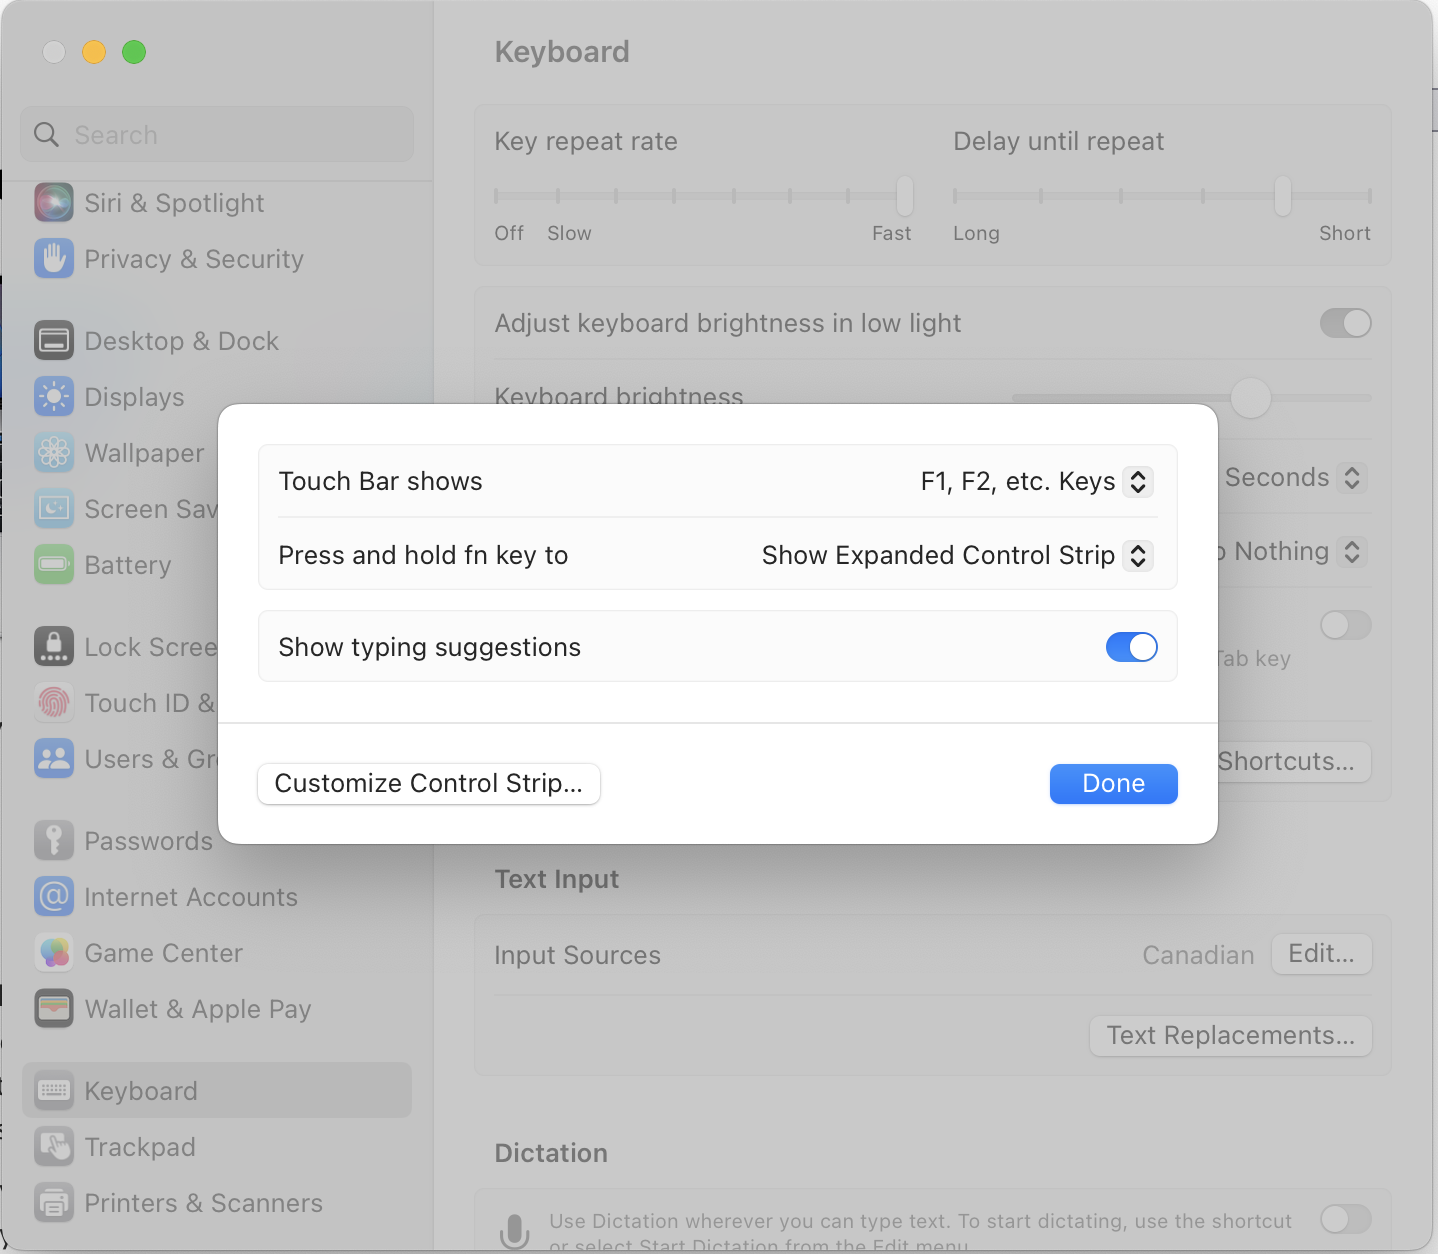
I have a 2019 MacBook Pro with Touchbar so the first change is to always display the function keys.

Within System Settings/Keyboard and Touch Bar Settings change:

  • Touch Bar Shows to “F1, F2, etc. Keys”
  • Press and hold fn key to “Show Expanded Control Strip”
Screenshot of macOS Touch Bar Preferences

Step 2

Install Raycast

Step 3

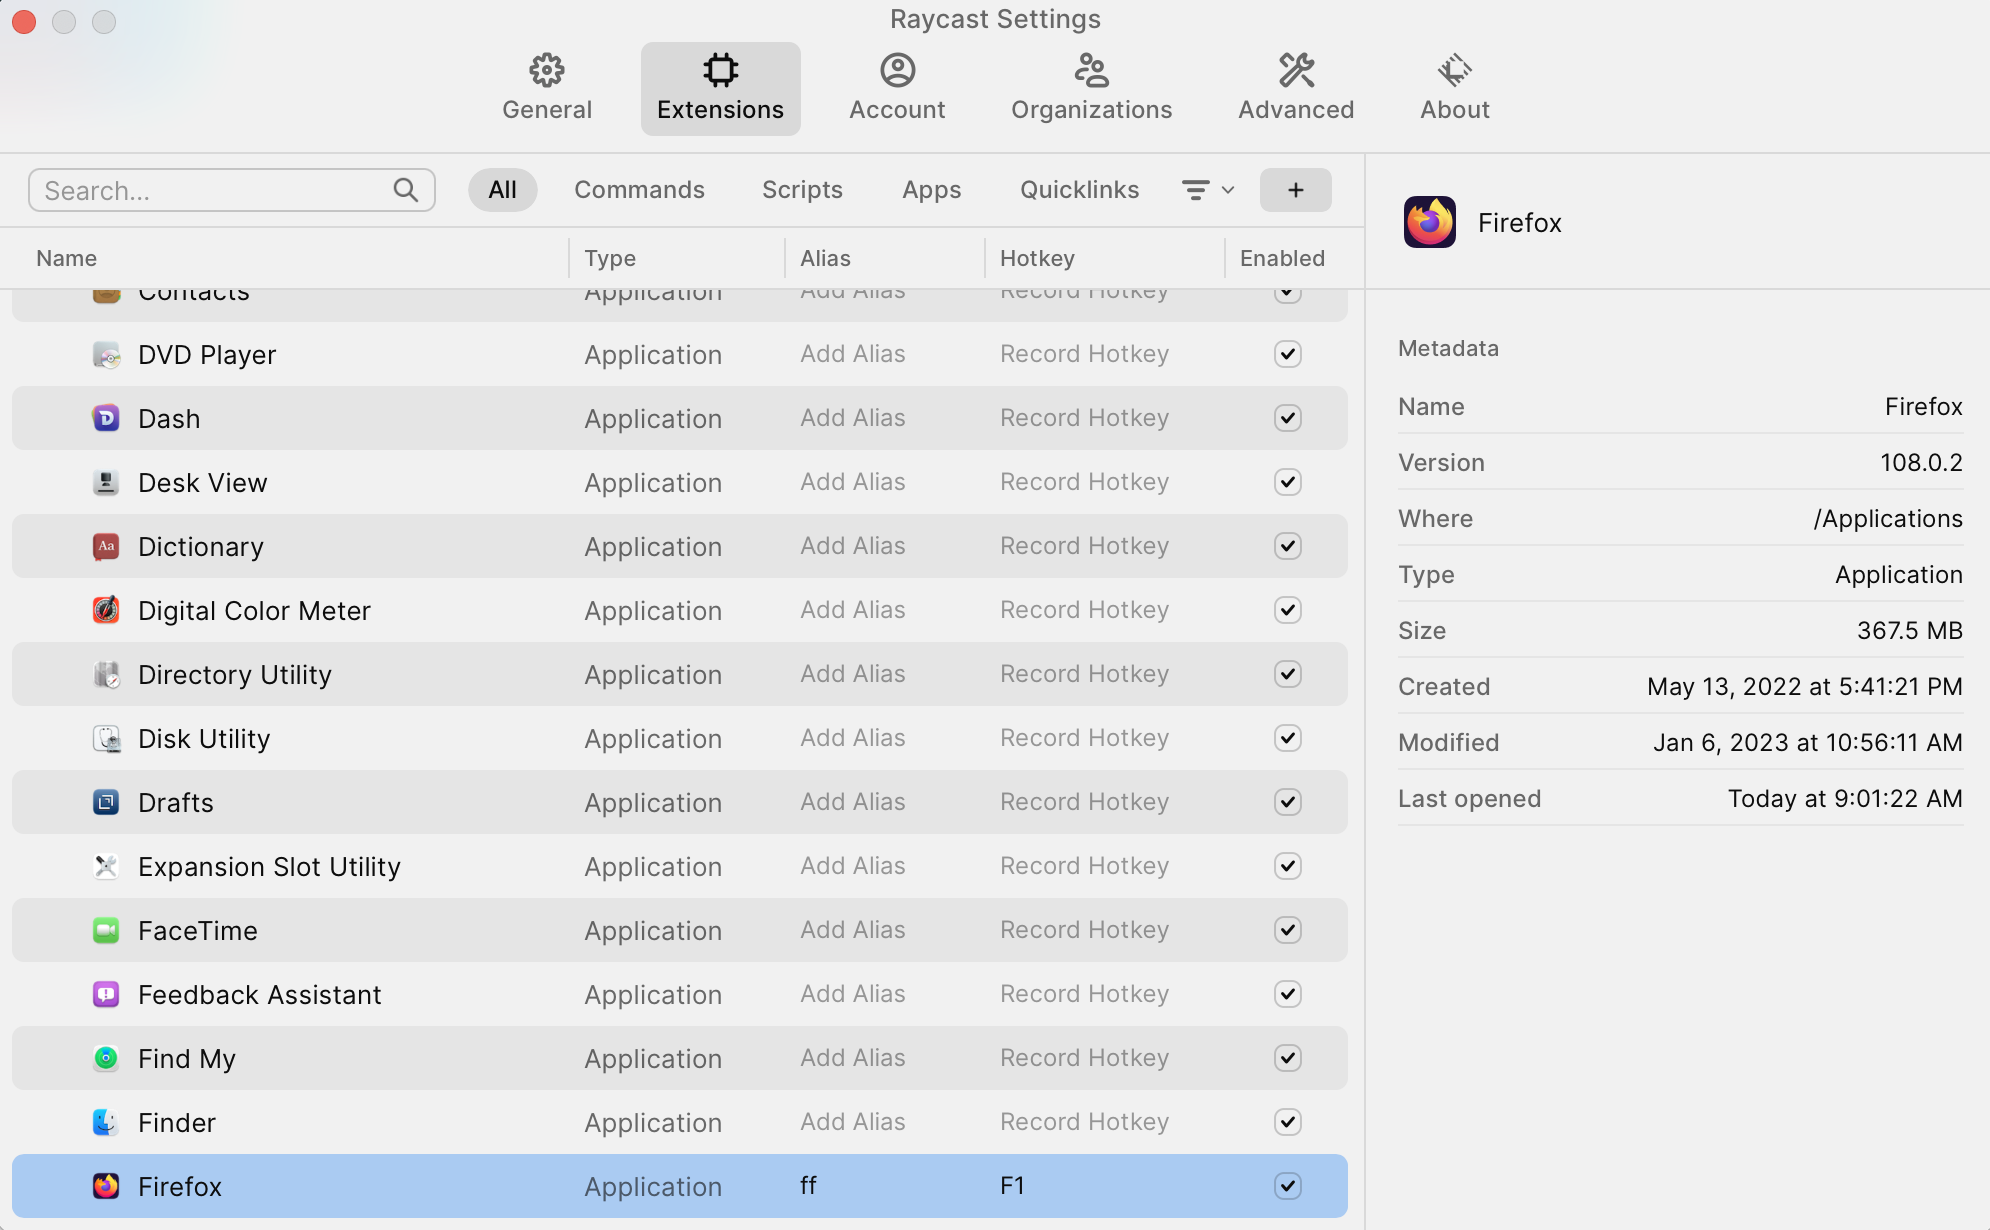
Open Raycast (I use ⌘Space), find the application you want to assign to a function key, and go into application configuration (using ⌘⇧,)

Raycast Application Settings Screen

Hit Record Hotkey and assign it to whatever Fn you want!

For example:

Aug 13, 2017

Managing Site Content with Sub

No self respecting developer will tolerate writing out the same commands over and over.

Automate All the Things!

With Jekyll building the static files, I needed a way to:

  • create draft posts
  • serve drafts via localhost to review
  • publish a draft as a full post
  • build the site
  • deploy to DigitalOcean

After manually running shell commands and manually editing files, I had to automate the workflow.

I use sub to organize the various scripts that handle each part of the process.

Create Draft Posts

First step was to create a template.md file with all the optional Front Matter a post might need.

---
title:

# # Rest are optional
# categories:
# tags:
# permalink:
# excerpt: # Markdown description before the story
# description: # SEO `<meta>` description (requires an `excerpt`)
# header:
#  image: # Path to the full image for the size (1280x...)
#  image_description: # Custom `alt` tag
#  caption: # Photo credit (can be written in markdown)
#  teaser: # Path to teaser image (roughly 500x300)
#
#  # Hero video image
#  video:
#    id: 
#    provider:
#
#  # An image with text overlay and call to action button
#  overlay_image: # Path to the full image size
#  overlay_filter: 0.5 # opacity between 0.0 and 1.0 (or full `rgba(255, 0, 0, 0.5)`)
#  cta_label: # Call to action button label
#  cta_url: # URL the call to action button goes to
#  overlay_color: # Can be used rather than `overlay_image` as #ccc
#
# NOTE: https://mmistakes.github.io/minimal-mistakes/docs/helpers/
#       https://mmistakes.github.io/minimal-mistakes/docs/utility-classes/
---

You’ll notice that only title is required. Everything is commented out. Also, there’s no date attribute since this is a draft.

When I begin writing a draft I run:

site draft whatever-the-post-slug-will-be

which runs:

#!/bin/sh
set -u
set -e

cp _drafts/template.md _drafts/${1}.md
exec $EDITOR _drafts/${1}.md

A simple script to copy the template into the _drafts/ folder with the slug name and then fire up my editor (NeoVim.)

Previewing Drafts on Localhost

Jekyll can preview drafts on the localhost. I run:

site serve

which executes:

#!/bin/sh

set -x
set -e

jekyll serve -D --watch

in a separate tmux pane. Jekyll is configured to watch for changes and rebuild the draft for preview.

Publishing

Once I’m happy with a draft it’s time to publish it (meaning promoting it from _drafts/ into _posts/.)

site publish whatever-the-post-slug-will-be

Which runs:

#! /usr/bin/env ruby
#
# Copy the file from the drafts folder, add the current date, and update the
# filename.  Remove any commented out lines from the front matter.
#

now = Time.now
draft = File.basename(ARGV[0], '.md')
draft_filename = File.join('_drafts', "#{draft_filename}.md")
post_filename = File.join('_posts', "#{now.strftime('%Y-%m-%d')}-#{draft}.md")
post = File.open(post_filename, 'w')

state = :start

open(draft_filename).readlines.each do |line|
  if (state == :start || state == :in_front_matter) && line =~ /^---/
    post.puts line

    if state == :start
      post.puts "date: #{now.strftime('%Y-%m-%d %H:%M:%S %:z')}"

      state = :in_front_matter
    else
      state = :body
    end
  elsif state == :in_front_matter && (line =~ /^#/ || line =~ /^\s$/)
    # Skip all the comment lines in the front matter
    next
  else
    post.puts line
  end
end

post.close

File.unlink(draft_filename) if File.exist?(post_filename)

This Ruby script:

  1. Adds the current date attribute to the Front Matter
  2. Removes all the commented out lines in the Front Matter
  3. Moves the file from the _drafts folder to the _posts folder and prefixes the current date to the file.

Deploy Updates to Production

With everything ready, it’s time to deploy the changes to the [site]({{ .Site.BaseURL }}). One last script:

site deploy

running:

#!/bin/sh

$_SITE_ROOT/bin/site build
rsync -crvz --delete-after --delete-excluded  _site/ wormbytes:/var/www/wormbytes.ca/

First we build the site:

#!/bin/sh

set -u
set -e

jekyll build

and then copy the _site/ directory up to the DigitalOcean production server, deleting any files that have been removed and updating any new files.

Aug 11, 2017

Let's Encrypt and Nginx on Ubuntu

A combination lock resting on a laptop keyboard

Configuring nginx to use SSL certificates from Let’s Encrypt using the Webroot method isn’t hard, but there are a few steps to make it all work. We assume:

  • you have only one website setup in nginx and that any additional sites will also use Let’s Encrypt for their SSL certificates.
  • HTML is served from /var/www/example.com

Prerequisites

  • Ubuntu 16.04
  • nginx
  • You must own or control the registered domain name that you wish to use the certificate with.
  • A DNS A Record that points your domain to the public IP address of your server. Let’s Encrypt requires this to validate that you own the domain. You will need an A Record for both www.example.com and example.com if you want to support both domains.

Step 1 - Installing Certbot

The easiest way to request a SSL certificate from Let’s Encrypt is to use the certbot. The Certbot developers have their own [Ubuntu] software repository with update-to-date versions of the software.

First add the repository:

sudo apt-get install software-properties-common
sudo add-apt-repository ppa:certbot/certbot
sudo apt-get update

You’ll need to press ENTER to accept the certbot repository.

Now install Certbot:

sudo apt-get install certbot

The certbot Let’s Encrypt client is now ready.

Step 2 - Create Nginx Configs

Let’s Encrypt uses a challenge system to ensure the domain for which the SSL certificate is about to be issued is controlled by the requester. To avoid duplicating the logic in every virtual host configuration (as we’re setting up both example.com and www.example.com) we’ll create a snippet.

sudo mkdir -p /etc/nginx/snippets/

Create /etc/nginx/snippets/letsencrypt.conf containing:

location ^~ /.well-known/acme-challenge/ {
	default_type "text/plain";
	root /var/www/letsencrypt;
}

Create the ACME challenge folder (as referenced above):

sudo mkdir -p /var/www/letsencrypt/.well-known/acme-challenge

We need to create the server specific dhparam.pem file. This will take a while:

sudo apt-get install openssl
sudo openssl dhparam -out /etc/ssl/certs/dhparam.pem 2048

Now, within /etc/nginx/conf.d we’ll create the global SSL settings. Create /etc/nginx/conf.d/ssl.conf containing:

ssl_session_timeout 1d;
ssl_session_cache shared:SSL:50m;
ssl_session_tickets off;

ssl_protocols TLSv1.2;

# Use the "Modern" cipher suite recommended by Mozilla
# https://wiki.mozilla.org/Security/Server_Side_TLS#Modern_compatibility
ssl_ciphers
'ECDHE-ECDSA-AES256-GCM-SHA384:ECDHE-RSA-AES256-GCM-SHA384:ECDHE-ECDSA-CHACHA20-POLY1305:ECDHE-RSA-CHACHA20-POLY1305:ECDHE-ECDSA-AES128-GCM-SHA256:ECDHE-RSA-AES128-GCM-SHA256:ECDHE-ECDSA-AES256-SHA384:ECDHE-RSA-AES256-SHA384:ECDHE-ECDSA-AES128-SHA256:ECDHE-RSA-AES128-SHA256';
ssl_ecdh_curve secp384r1;
ssl_prefer_server_ciphers on;
ssl_dhparam /etc/ssl/certs/dhparam.pem;

ssl_stapling on;
ssl_stapling_verify on;

# Enable HTST to ensure communication is only over SSL
add_header Strict-Transport-Security "max-age=15768000; includeSubdomains;
preload";
add_header X-Frame-Options DENY;
add_header X-Content-Type-Options nosniff;

Step 3 - Configure Domain to Respond to ACME Challenge

As we don’t have any SSL certificates yet, we need to configure our domain to respond to the ACME challenges. Assuming your nginx virtual server configuration is at /etc/nginx/sites-available/example.com.conf add:

include /etc/nginx/snippets/letsencrypt.conf;

between your server { ... } blocks.

Enable the site:

sudo rm /etc/nginx/sites-enabled/default
sudo ln -s /etc/nginx/sites-available/example.com.conf /etc/nginx/sites-enabled/example.com.conf

And then reload nginx:

sudo systemctl reload nginx

Step 4 - Obtaining an SSL Certificate

Request the certificate (don’t forget to replace with your own email address):

certbot certonly --webroot --agree-tos --no-eff-email --email YOUR@EMAIL.COM -w /var/www/letsencrypt -d www.example.com -d example.com

It will save the files into /etc/letsencrypt/live/www.example.com/

Note: The --no-eff-flag opts out of signing up for the EFF mailing list.

Step 5 - Setup HTTPS-Only Virtual Hosts

Now that we have the SSL certificates, switch your domain to HTTPS. Edit /etc/nginx/sites-available/domain.com.conf and replace the HTTP server configs with:

## http://example.com redirects to https://example.com
server {
	listen 80;
	listen [::]:80;
	server_name example.com;

	include /etc/nginx/snippets/letsencrypt.conf;

	location / {
		return 301 https://example.com$request_uri;
	}
}

## http://www.example.com redirects to https://www.example.com
server {
	listen 80 default_server;
	listen [::]:80 default_server ipv6only=on;
	server_name www.example.com;

	include /etc/nginx/snippets/letsencrypt.conf;

	location / {
		return 301 https://www.example.com$request_uri;
	}
}

## https://example.com redirects to https://www.example.com
server {
	listen 443 ssl;
	listen [::]:443 ssl;
	server_name example.com;

	ssl_certificate /etc/letsencrypt/live/www.example.com/fullchain.pem;
	ssl_certificate_key /etc/letsencrypt/live/www.example.com/privkey.pem;
	ssl_trusted_certificate /etc/letsencrypt/live/www.example.com/fullchain.pem;

	location / {
		return 301 https://www.example.com$request_uri;
	}
}

## Serves https://www.example.com
server {
	server_name www.example.com;
	listen 443 ssl default_server;
	listen [::]:443 ssl default_server ipv6only=on;

	ssl_certificate /etc/letsencrypt/live/www.example.com/fullchain.pem;
	ssl_certificate_key /etc/letsencrypt/live/www.example.com/privkey.pem;
	ssl_trusted_certificate /etc/letsencrypt/live/www.example.com/fullchain.pem;

  # The rest of your previous HTTP virtual server configuration.  Below is an
  # example:
	root /var/www/example.com;
	index index.html;
	location / {
		try_files $uri $uri/ =404;
	}
}

Finally, reload nginx:

sudo systemctl reload nginx

Note that http://example.com redirects to https://example.com (which redirects to https://www.example.com) because redirecting to https://www.example.com directly would be incompatible with HSTS.

Step 6 - Automatic Renewal using Cron

Certbot can renew all certificates that expire within 30 days. We’ll create a cronjob that automatically updates the certificates (and restarts nginx to pick up the changes.)

Let’s try a dry-run to ensure that everything is working:

sudo certbot renew --dry-run

Create /usr/local/sbin/letsencrypt.sh containing:

#!/bin/bash
systemctl reload nginx

# If you have other services that use the certificates add reloads here:

Make it executable:

sudo chmod +x /usr/local/sbin/letsencrypt.sh

Edit the root’s cron:

sudo crontab -e

And add:

20 3 * * * certbot renew --noninteractive --renew-hook /usr/local/sbin/letsencrypt.sh

Conclusion

And that’s it! If all went well you should see your site at https://www.example.com/!
May 15, 2006

Relaying Mail through Sympatico Using Postfix

Customers of Sympatico’s high-speed Internet service receive instructions on how to set up their email; however, these settings are aimed at people using Outlook, Netscape, or Eudora. What I needed were instructions on how to configure my local SMTP server, Postfix, with Sympatico. Of course, that information is not available. This document details how I figured out the settings required to make smtphm.sympatico.ca happy.

Installation

You need a version of Postfix built with TLS and SASL support enabled. If your distribution doesn’t come with it pre-built follow the instructions at:

On my Debian unstable system I simply did:

apt-get install postfix libsasl2-modules

Configuration

I’m assuming that your Postfix configuration directory it /etc/postfix. Adjust appropriately to accommodate your system.

To use SASL we need a password file containing our user name and password for the server we are connecting to. Per Sympatico’s instructions the server is smtphm.sympatico.ca.

cd /etc/postfix
mkdir sasl && cd sasl
echo "[smtphm.sympatico.ca] USERNAME@symaptico.ca:PASSWORD" > passwd
postmap hash:passwd

The above creates the password file and the hash-based database file that Postfix uses. Of course replace USERNAME with your [% symaptico %] user name, and PASSWORD with your password (the email password, not the b1 password to access the Internet.)

Make sure in your main.cf you have configured your relayhost as: relayhost = [smtphm.sympatico.ca]

Finally, add the following lines to your main.cf file:

# Enable TLS/SASL for the smtphm.sympatico.ca server
smtp_use_tls = yes
smtp_tls_note_starttls_offer = yes
tls_random_source = dev:/dev/urandom

smtp_sasl_auth_enable = yes
smtp_sasl_password_maps = hash:/etc/postfix/sasl/passwd
smtp_sasl_security_options = 

Restart Postfix and send a test message. If all went well you should see the successful sending of the message in the Postfix log file.

Good luck!